Tutorials
These tutorials can help you get started developing different kinds of applications on Tezos in as little as 15 minutes.
import TutorialCard from '@site/src/components/TutorialCard';
import TutorialCardContainer from '@site/src/components/TutorialCardContainer';
Beginner
These tutorials are intended for developers who are starting work with Tezos:
Intermediate
These tutorials contain multiple parts and are intended for developers with some application development experience:
Advanced
These tutorials are intended for developers who are familiar with Tezos and want to get into more powerful applications:
Deploy a smart contract
This tutorial covers deploying a smart contract to Tezos.
It covers how to:
Connect to a testnet
Create a wallet
Get tokens from a faucet
Code a contract, including:
Defining the storage for the contract
Defining entrypoints in the contract
Writing code to run when the entrypoints are called
Deploy (or originate) the contract to Tezos and set its starting storage value
Look up the current state of the contract
Call the contract
This tutorial has different versions for different programming languages.
You can run the tutorial with the version of the language you are most familiar with or want to learn.
You do not need an experience in these languages to run the tutorial.
To use SmartPy, a language similar to Python, see Deploy a smart contract with SmartPy
To use JsLIGO, a language similar to JavaScript and TypeScript, see Deploy a smart contract with JsLIGO
To use CameLIGO, a language similar to OCaml, see Deploy a smart contract with CameLIGO
To learn the Archetype language, try Deploy a smart contract with Archetype.
Deploy a smart contract with JsLIGO
This tutorial covers writing and deploying a simple smart contract with the LIGO programming language.
Specifically, this tutorial uses the JsLIGO version of LIGO, which has syntax similar to JavaScript, but you don't need any experience with JavaScript or LIGO to do this tutorial.
If you are more familiar with Python, try Deploy a smart contract with SmartPy.
If you are more familiar with OCaml, try Deploy a smart contract with CameLIGO.
To learn the Archetype language, try Deploy a smart contract with Archetype.
LIGO is a high-level programming language that you can use to write smart contracts for the Tezos blockchain.
It abstracts away the complexity of using Michelson (the smart contract language directly available on-chain) to make it easier to write smart contracts on Tezos.
In this tutorial, you will learn how to:
Create a wallet to store cryptocurrency tokens
Get free tez tokens (the native cryptocurrency token on Tezos) from a faucet
Code a contract in LIGO, including:
Defining the storage for the contract
Defining entrypoints in the contract
Writing code to run when the entrypoints are called
Deploy (or originate) the contract to Tezos and set its starting storage value
Look up the current state of the contract
Call the contract
What is a smart contract?
A smart contract is a computer program that is stored on a blockchain and runs on a blockchain.
Because the blockchain is spread across many computer nodes, you don't have to think about where to host the program or worry whether a computer will run it or not.
Responsibility for running the contract is distributed across all of the nodes in the Tezos system, so when you deploy a smart contract, you can be confident that it will be available and unmodified when someone wants to run it.
A smart contract has these parts:
Persistent storage, data that the contract can read and write
One or more entrypoints, which are a kind of function that clients can call, like endpoints in an API or functions or methods in many programming languages
A Tezos account that can store tokens (technically, the contract is itself a type of Tezos account, but you can think of it as a program with a Tezos account)
Tutorial contract
The contract that you deploy in this tutorial stores a single integer.
It provides entrypoints that clients can call to change the value of that integer:
The increment entrypoint accepts an integer as a parameter and adds that integer to the value in storage
The decrement entrypoint accepts an integer as a parameter and subtracts that integer from the value in storage
The reset entrypoint takes no parameters and resets the value in storage to 0
After you deploy the contract, you or any other user can call it from various sources, including web applications, other contracts, and the Octez command-line client.
However, no one can prevent it from running or tamper with its code or its storage.
Creating and funding a wallet
To deploy and work with the contract, you need a wallet and some tez tokens.
You can get test tokens for free on the Ghostnet test network:
Install a Tezos-compatible wallet.
Which wallet you install is up to you and whether you want to install a wallet on your computer, in a browser extension, or as a mobile app.
If you don't know which one to choose, try the Temple browser extension.
Desktop wallets for Tezos include the Temple browser extension, Kukai, and Umami.
Mobile apps include Temple, Kukai, and Umami.
Switch the wallet to use the Ghostnet testnet instead of Tezos Mainnet.
Ghostnet is a network for testing Tezos applications where tokens are free so you don't have to spend real currency to work with your applications.
For example, for the Temple browser wallet, click Tezos Mainnet at the top and then click Ghostnet Testnet, as in this picture:
Selecting the Ghostnet testnet in the Temple wallet
From your wallet, get the address of your account, which starts with tz1.
This is the address that applications use to work with your wallet.
Go to the Ghostnet faucet page at https://faucet.ghostnet.teztnets.com.
On the faucet page, paste your wallet address into the input field labeled "Or fund any address" and click the button for the amount of tez to add to your wallet.
20 tez is enough to work with the tutorial contract, and you can return to the faucet later if you need more tez.
It may take a few minutes for the faucet to send the tokens and for those tokens to appear in your wallet.
You can use the faucet as much as you need to get tokens on the testnet, but those tokens are worthless and cannot be used on Mainnet.
Fund your wallet using the Ghostnet Faucet
Now you have an account and funds that you can use to work with Tezos.
Creating the contract
The contract that you will create has these basic parts:
A type that describes the contract's storage, in this case an integer.
The storage can be a primitive type such as an integer, string, or timestamp, or a complex data type that contains multiple values.
For more information on contract data types, see Data types.
Functions called entrypoints that run code when clients call the contract.
A type that describes the return value of the entrypoints.
Follow these steps to create the code for the contract:
Open the LIGO online IDE at https://ide.ligolang.org/.
You can work with LIGO code in any IDE, but this online IDE keeps you from having to install software on your computer, and it also simplifies the process of deploying contracts.
At the top right of the page, in the Network menu, select Ghostnet, as shown in this picture:
Selecting Ghostnet in the list of networks
Connect a wallet to the IDE:
At the top right of the page, click the Keypair Manager  button.
In the Keypair Manager window, import the account that you created earlier or create and fund a new account to use with the IDE.
To import the account that you created earlier, export the private key from your wallet app, click Import in the Keypair Manager window, and paste the private key.
Now you can use your account in the IDE.
To create an account to use with the IDE, click Create in the Keypair Manager window, give the new keypair a name, and click Create.
Then, copy the address of the keypair and get tez from the faucet as you did in Creating and funding a wallet.
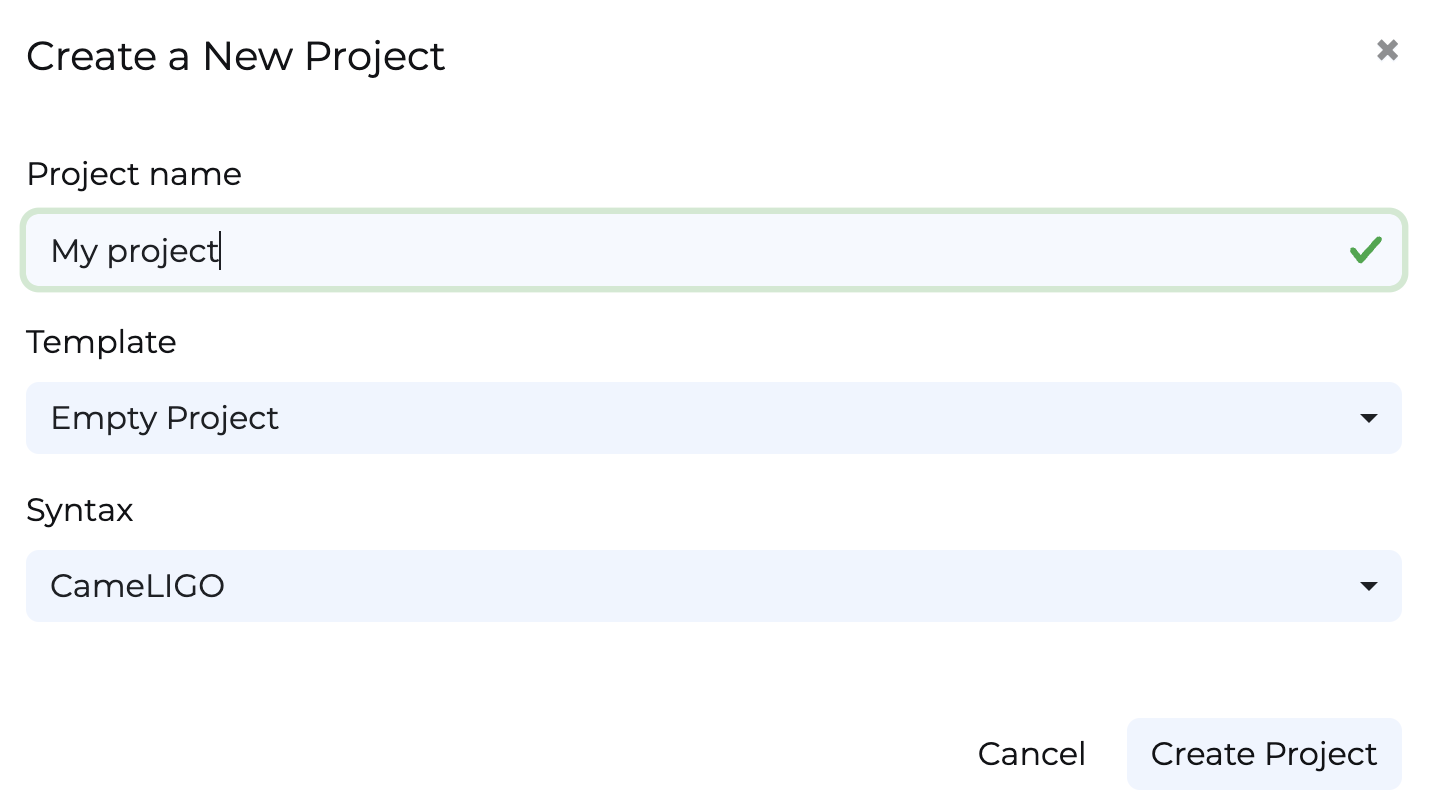
In the IDE, create a project from the empty template and select the JsLIGO syntax, as shown in this picture:
button.
In the Keypair Manager window, import the account that you created earlier or create and fund a new account to use with the IDE.
To import the account that you created earlier, export the private key from your wallet app, click Import in the Keypair Manager window, and paste the private key.
Now you can use your account in the IDE.
To create an account to use with the IDE, click Create in the Keypair Manager window, give the new keypair a name, and click Create.
Then, copy the address of the keypair and get tez from the faucet as you did in Creating and funding a wallet.
In the IDE, create a project from the empty template and select the JsLIGO syntax, as shown in this picture:
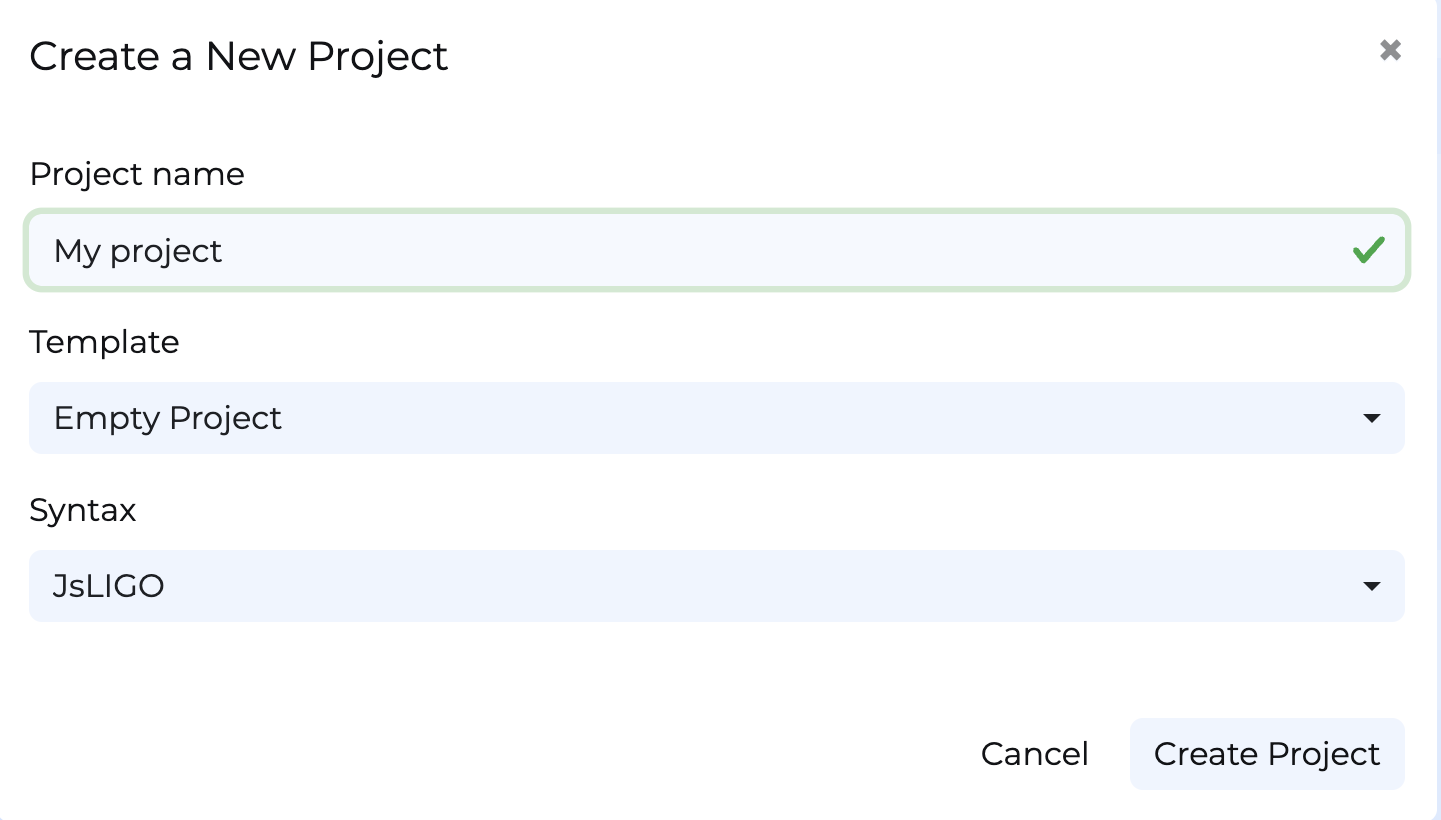 The IDE creates a project and a contract file named Contract.jsligo.
In the contract file, create a namespace named Counter to hold the code for the contract:
Inside the namespace, create a TypeScript type to set the storage type to an integer:
Add this code to define the return type for the entrypoints.
Tezos entrypoints return two values: a list of other operations to call and the new value of the contract's storage.
Add the code for the increment and decrement entrypoints:
These functions begin with the @entry annotation to indicate that they are entrypoints.
They accept two parameters: the change in the storage value (an integer) and the current value of the storage (in the storage type that you created earlier in the code).
They return a value of the type returnValue that you created in the previous step.
Each function returns an empty list of other operations to call and the new value of the storage.
Add this code for the reset entrypoint:
This function is similar to the others, but it does not take the current value of the storage into account.
It always returns an empty list of operations and 0.
The complete contract code looks like this:
Testing and compiling the contract
Before you can deploy the contract to Tezos, you must compile it to Michelson, the base language of Tezos contracts.
Set the compiler to target the namespace to compile in your code:
On the left side of the page, under Actions, click Project Settings.
On the Project Settings tab, in the Module name field, set the module name to Counter.
Close the Project Settings tab.
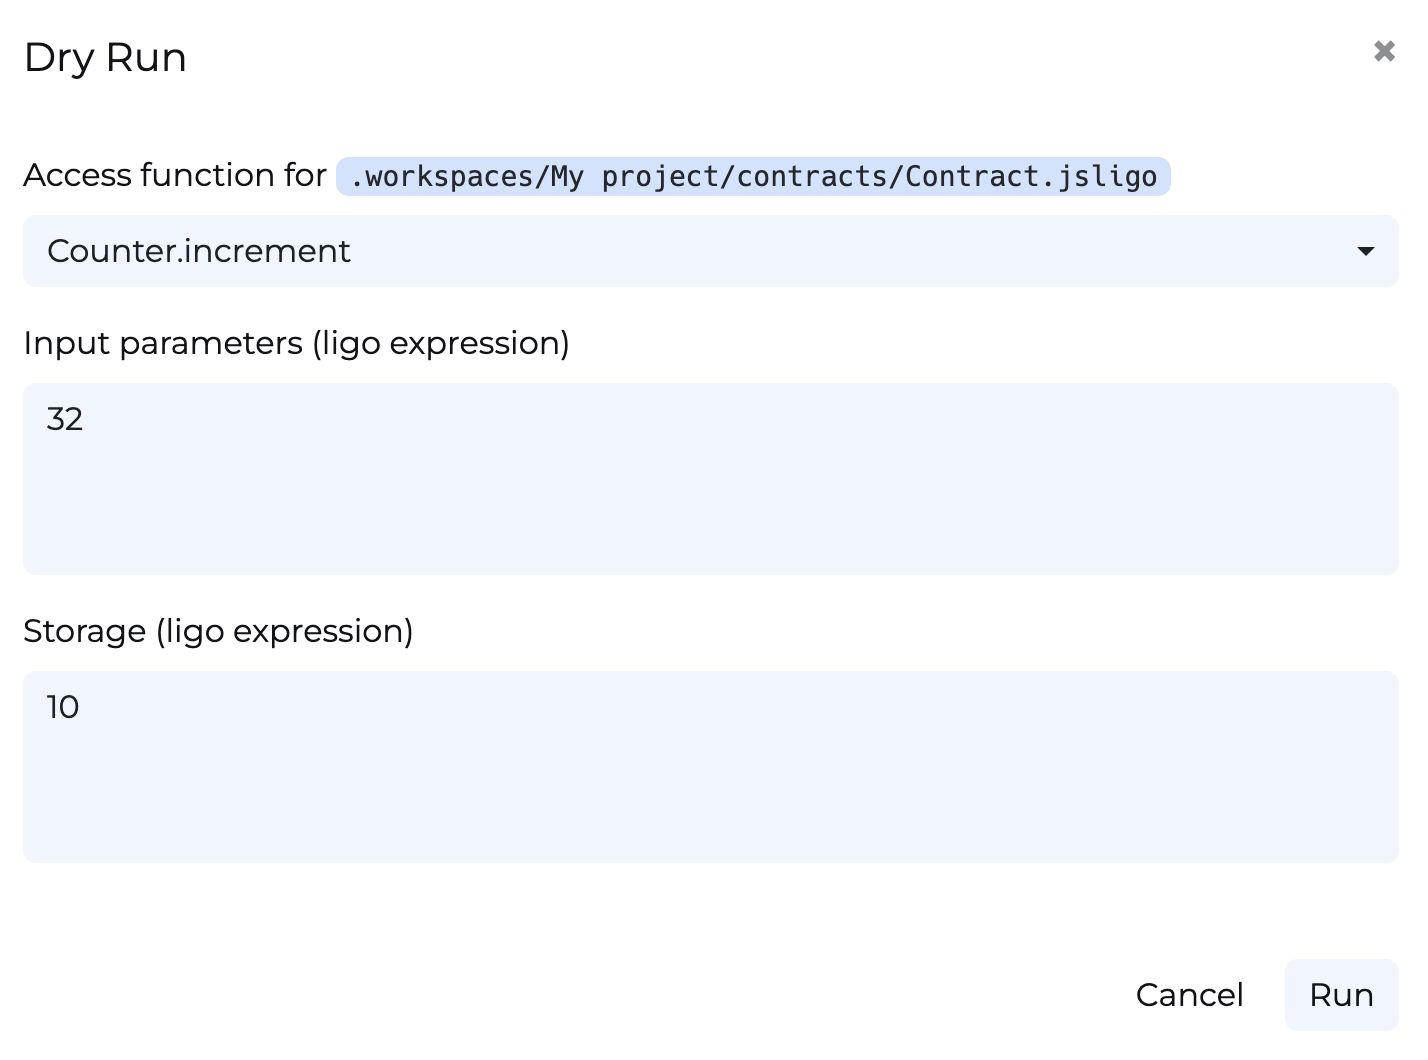
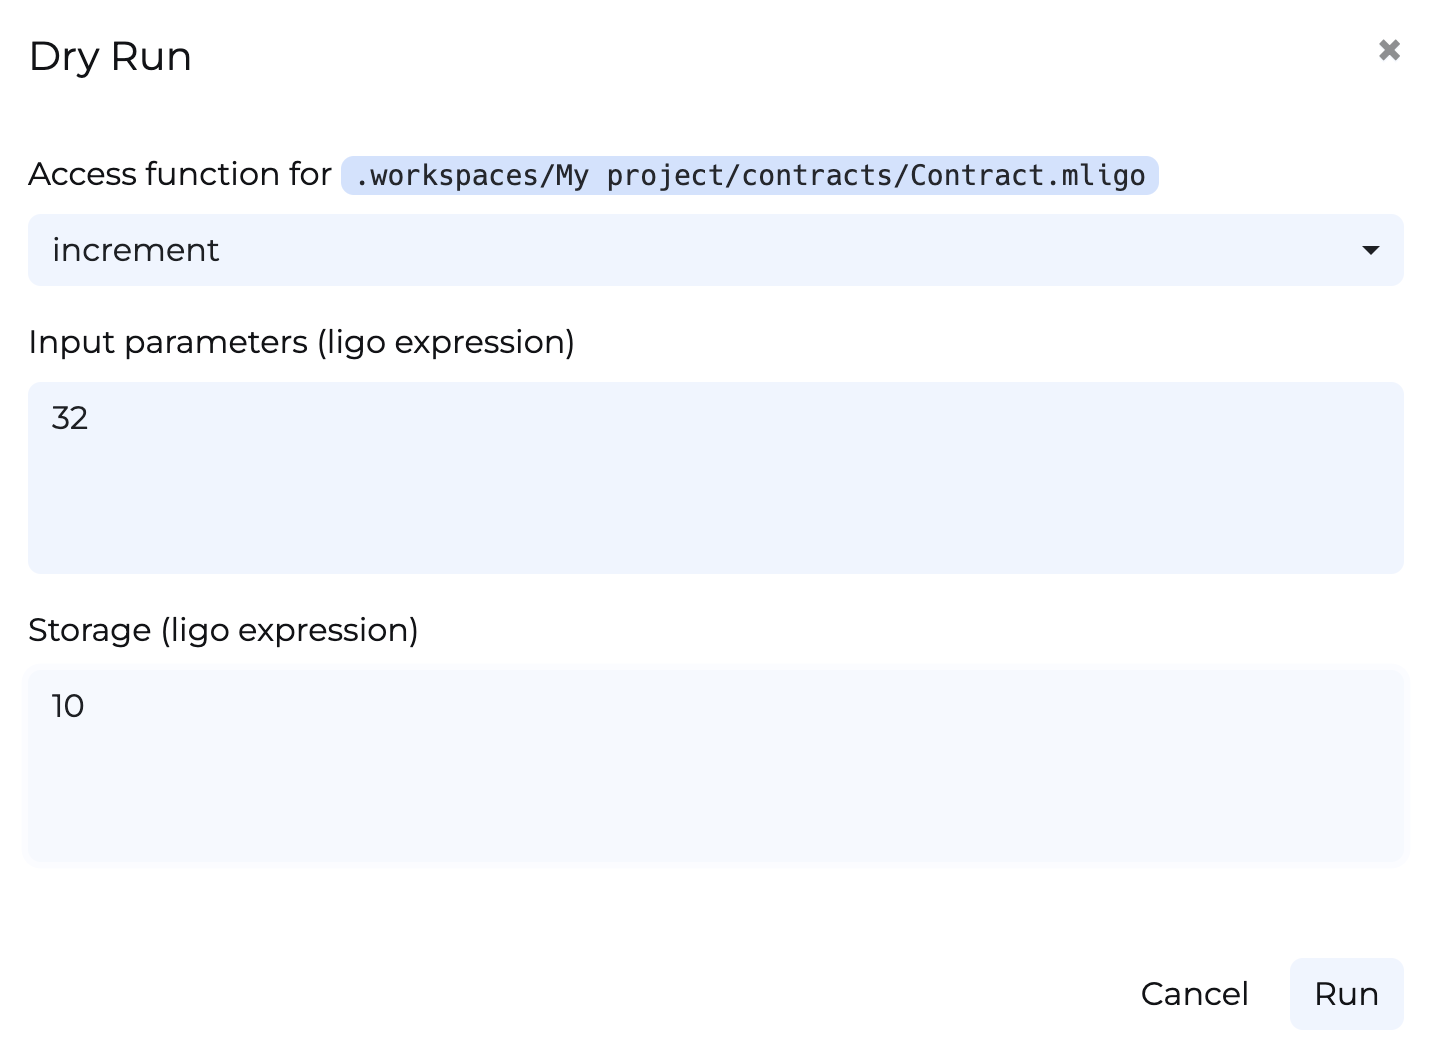
Test the contract by passing parameters and the storage value to the LIGO dry-run command:
On the left side of the page, under Actions, click Dry Run.
In the Dry Run window, select the Increment entrypoint, set the input parameter to 32 and the storage to 10.
The Dry Run window looks like this:
The IDE creates a project and a contract file named Contract.jsligo.
In the contract file, create a namespace named Counter to hold the code for the contract:
Inside the namespace, create a TypeScript type to set the storage type to an integer:
Add this code to define the return type for the entrypoints.
Tezos entrypoints return two values: a list of other operations to call and the new value of the contract's storage.
Add the code for the increment and decrement entrypoints:
These functions begin with the @entry annotation to indicate that they are entrypoints.
They accept two parameters: the change in the storage value (an integer) and the current value of the storage (in the storage type that you created earlier in the code).
They return a value of the type returnValue that you created in the previous step.
Each function returns an empty list of other operations to call and the new value of the storage.
Add this code for the reset entrypoint:
This function is similar to the others, but it does not take the current value of the storage into account.
It always returns an empty list of operations and 0.
The complete contract code looks like this:
Testing and compiling the contract
Before you can deploy the contract to Tezos, you must compile it to Michelson, the base language of Tezos contracts.
Set the compiler to target the namespace to compile in your code:
On the left side of the page, under Actions, click Project Settings.
On the Project Settings tab, in the Module name field, set the module name to Counter.
Close the Project Settings tab.
Test the contract by passing parameters and the storage value to the LIGO dry-run command:
On the left side of the page, under Actions, click Dry Run.
In the Dry Run window, select the Increment entrypoint, set the input parameter to 32 and the storage to 10.
The Dry Run window looks like this:
 Click Run.
At the bottom of the window, the Result field shows the response (LIST_EMPTY(), 42).
This response means that the contract did not call any other contracts, so the list of operations is empty.
Then it shows the new value of the storage.
You can test the decrement function in the same way.
If you see any errors, make sure that the code of your contract matches the code in the previous section.
Test the Reset entrypoint in the same way, but pass unit as the input parameter and any integer in the storage field.
The Reset entrypoint takes no parameters, but technically it accepts the value unit, which means no parameter.
The Result field shows the response (LIST_EMPTY(), 0), which means that the storage value is now 0.
On the left side of the page, under Actions, click Compile, and in the Compile window, click Compile again.
If the compilation succeeds, the IDE prints the compiled code to the terminal and saves it to the file build/contracts/Contract.tz.
You can see the code by expanding your project on the left side of the page, under .workspaces, and double-clicking Contract.tz.
If you see error messages, verify that your contract code matches the code in the previous section.
Now you can deploy the contract.
Deploying (originating) to the testnet
Deploying a contract to the network is called "originating."
Originating the contract requires a small amount of Tezos tokens as a fee.
On the left side of the page, under Actions, click Deploy.
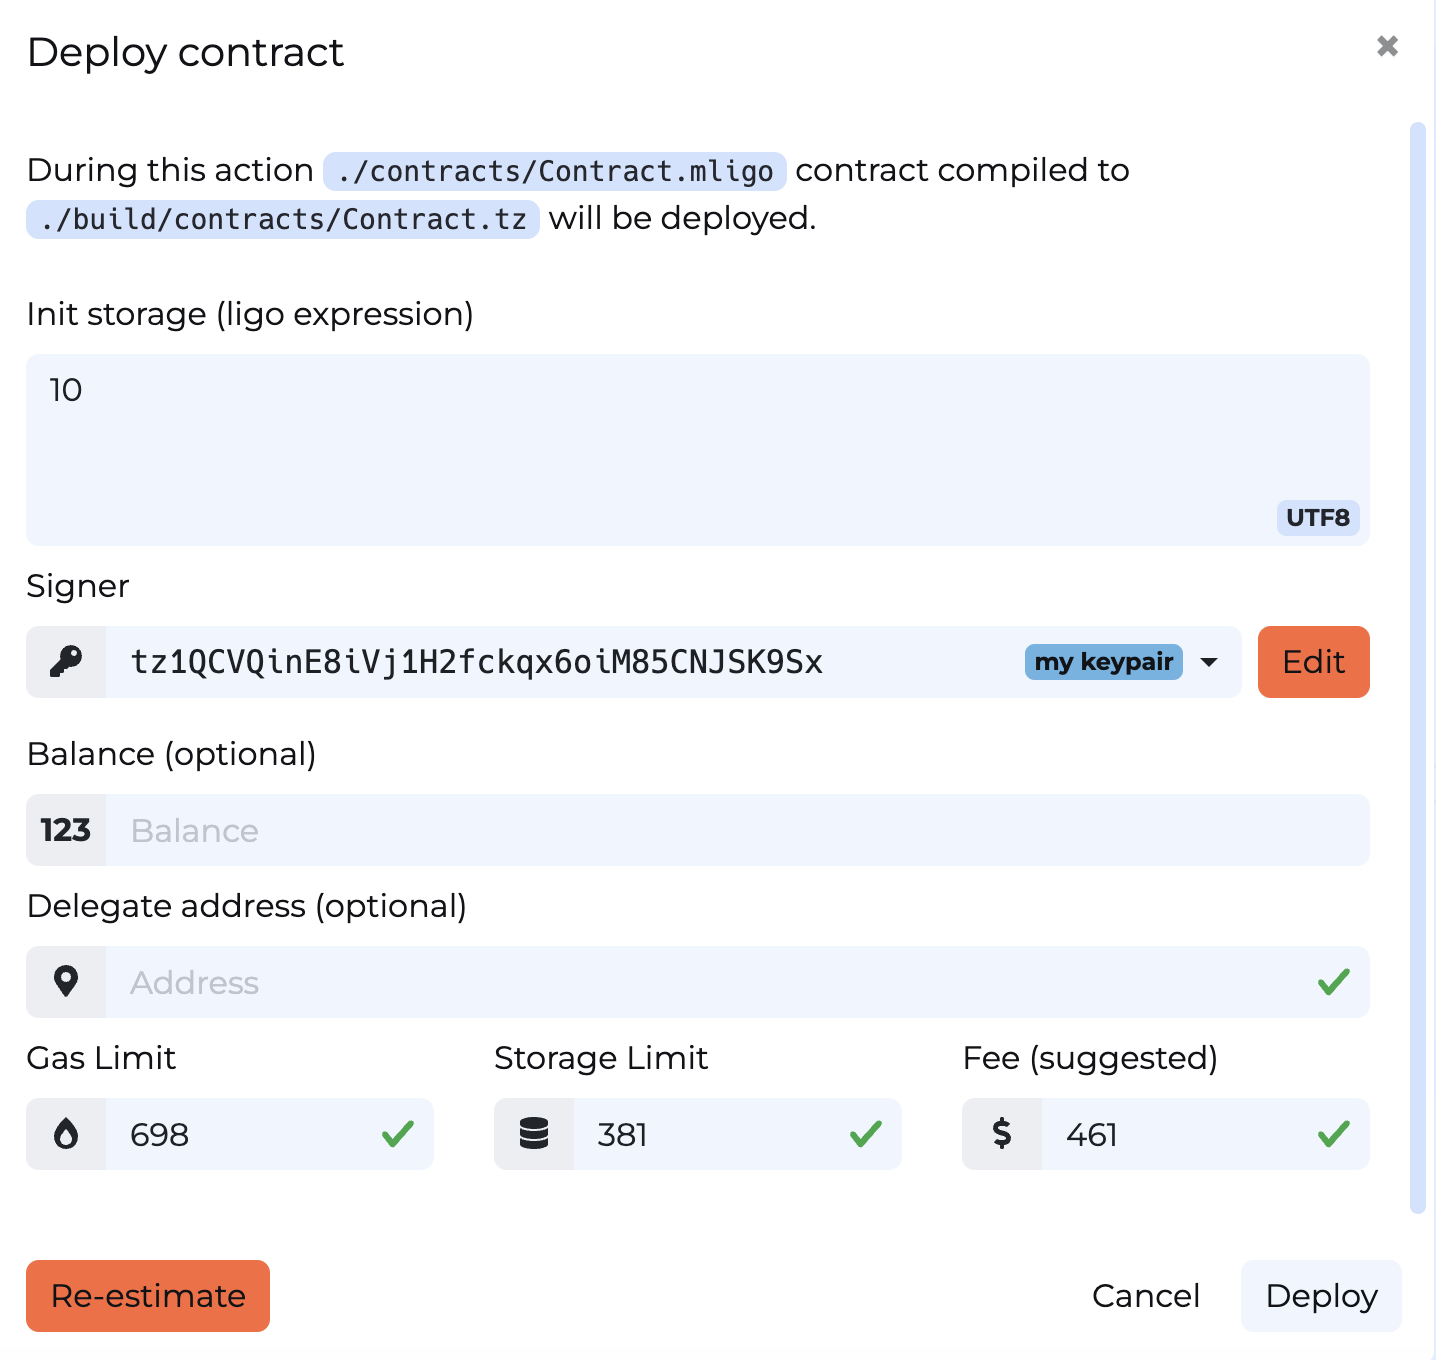
You may see a warning that the initial storage is not set.
You can ignore this warning because you can set the initial storage now.
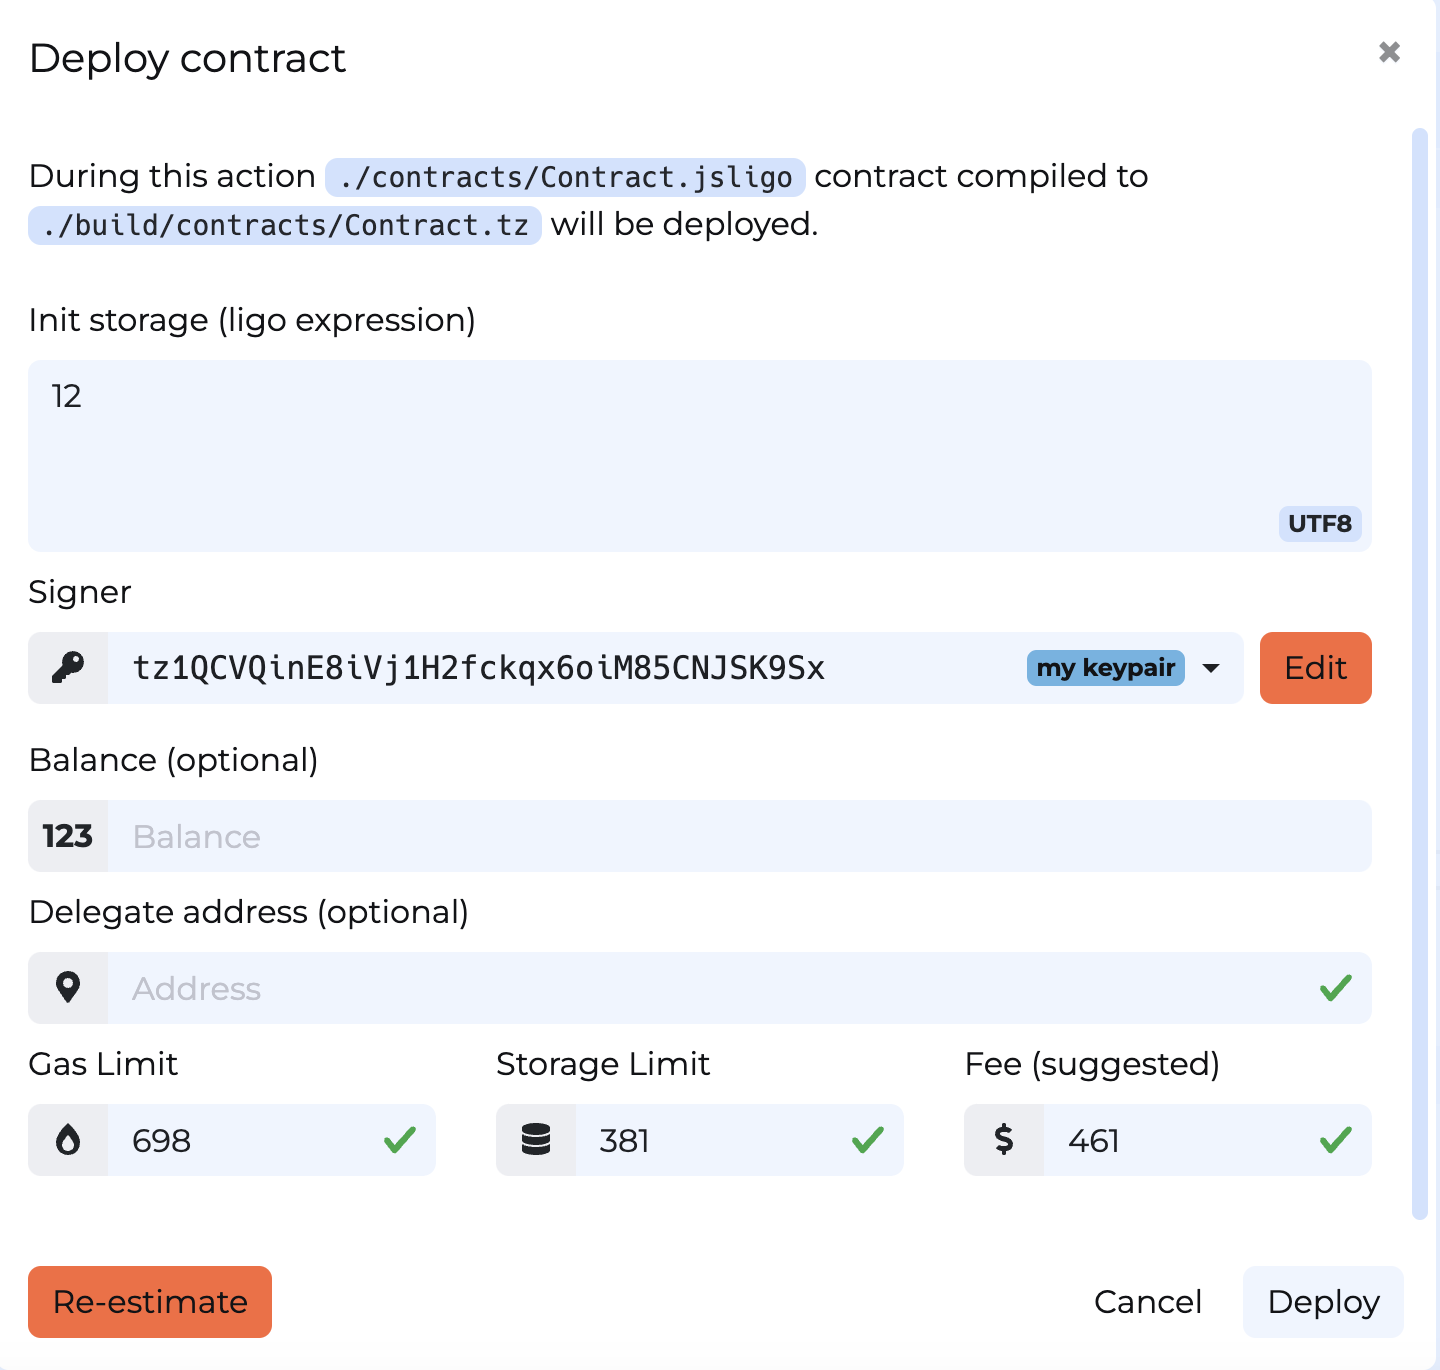
In the Deploy contract window, in the Init storage field, set the initial value for the contract's storage to an integer.
In the Signer field, make sure your account is selected.
Click Estimate.
The window shows the estimated fees to deploy the contract, as in this picture:
Click Run.
At the bottom of the window, the Result field shows the response (LIST_EMPTY(), 42).
This response means that the contract did not call any other contracts, so the list of operations is empty.
Then it shows the new value of the storage.
You can test the decrement function in the same way.
If you see any errors, make sure that the code of your contract matches the code in the previous section.
Test the Reset entrypoint in the same way, but pass unit as the input parameter and any integer in the storage field.
The Reset entrypoint takes no parameters, but technically it accepts the value unit, which means no parameter.
The Result field shows the response (LIST_EMPTY(), 0), which means that the storage value is now 0.
On the left side of the page, under Actions, click Compile, and in the Compile window, click Compile again.
If the compilation succeeds, the IDE prints the compiled code to the terminal and saves it to the file build/contracts/Contract.tz.
You can see the code by expanding your project on the left side of the page, under .workspaces, and double-clicking Contract.tz.
If you see error messages, verify that your contract code matches the code in the previous section.
Now you can deploy the contract.
Deploying (originating) to the testnet
Deploying a contract to the network is called "originating."
Originating the contract requires a small amount of Tezos tokens as a fee.
On the left side of the page, under Actions, click Deploy.
You may see a warning that the initial storage is not set.
You can ignore this warning because you can set the initial storage now.
In the Deploy contract window, in the Init storage field, set the initial value for the contract's storage to an integer.
In the Signer field, make sure your account is selected.
Click Estimate.
The window shows the estimated fees to deploy the contract, as in this picture:
 Click Deploy.
The deployment process can take a few minutes.
When the contract is deployed, the Deploy contract window shows the address at the bottom of the window.
Copy the address of the deployed contract, which starts with KT1.
:::warning
Copy the contract address now, because it will not be shown again.
:::
Now you can call the contract from any Tezos client, including web applications and command-line applications like The Octez client.
Calling the contract
These steps show you how to inspect the contract with a block explorer, which is a web application that shows information about Tezos.
It also allows you to call the contract.
Open the block explorer Better Call Dev at this link: https://better-call.dev/
Paste the address of the contract in the search field and press Enter.
The block explorer shows information about the contract, including recent transactions and the current state of its storage.
Click Deploy.
The deployment process can take a few minutes.
When the contract is deployed, the Deploy contract window shows the address at the bottom of the window.
Copy the address of the deployed contract, which starts with KT1.
:::warning
Copy the contract address now, because it will not be shown again.
:::
Now you can call the contract from any Tezos client, including web applications and command-line applications like The Octez client.
Calling the contract
These steps show you how to inspect the contract with a block explorer, which is a web application that shows information about Tezos.
It also allows you to call the contract.
Open the block explorer Better Call Dev at this link: https://better-call.dev/
Paste the address of the contract in the search field and press Enter.
The block explorer shows information about the contract, including recent transactions and the current state of its storage.
 Try calling one of the entrypoints:
Go to the Storage tab and check the current state of the storage, which should be the integer that you put in the Deploy window.
Go to the Interact tab.
This tab shows the entrypoints in the contract and lets you use them.
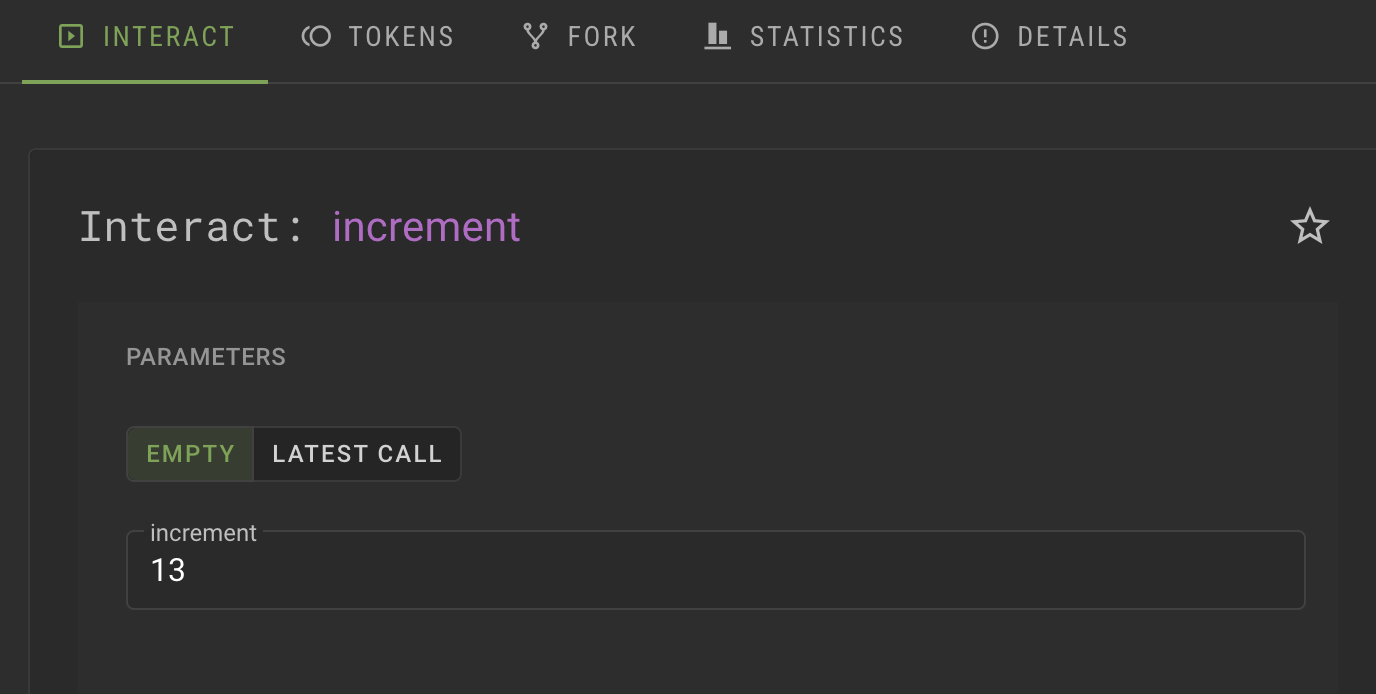
For the increment entrypoint, in the Parameters section, put an integer in the field, as shown in this image:
Try calling one of the entrypoints:
Go to the Storage tab and check the current state of the storage, which should be the integer that you put in the Deploy window.
Go to the Interact tab.
This tab shows the entrypoints in the contract and lets you use them.
For the increment entrypoint, in the Parameters section, put an integer in the field, as shown in this image:
 Click Execute and then click Wallet.
Select your wallet and connect it to the application.
Confirm the transaction in your wallet.
Wait for a success message that says "The transaction has successfully been broadcasted to the network."
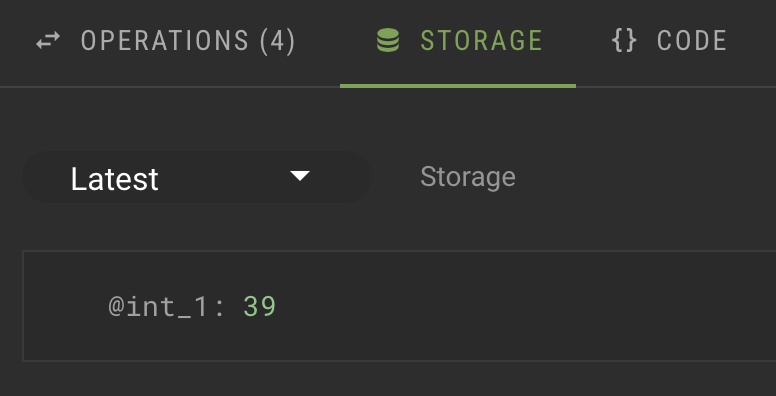
Go back to the Storage tab and see the new value of the storage, as in this picture:
Click Execute and then click Wallet.
Select your wallet and connect it to the application.
Confirm the transaction in your wallet.
Wait for a success message that says "The transaction has successfully been broadcasted to the network."
Go back to the Storage tab and see the new value of the storage, as in this picture:
 Summary
Now the contract is running on the Tezos blockchain.
You or any other user can call it from any source that can send transactions to Tezos, including Octez, dApps, and other contracts.
If you want to continue working with this contract, here are some ideas:
Change permissions for the contract so only your account can call its entrypoints
Add your own entrypoints and originate a new contract; note that you cannot update the existing contract after it is deployed
Create a dApp to call the contract from a web application, similar to the dApp that you create in the tutorial Build a simple web application
Deploy a smart contract with CameLIGO
This tutorial covers writing and deploying a simple smart contract with the LIGO programming language.
Specifically, this tutorial uses the CameLIGO version of LIGO, which has syntax similar to OCaml, but you don't need any experience with OCaml or LIGO to do this tutorial.
If you are more familiar with JavaScript, try Deploy a smart contract with JsLIGO.
If you are more familiar with Python, try Deploy a smart contract with SmartPy.
To learn the Archetype language, try Deploy a smart contract with Archetype.
LIGO is a high-level programming language that you can use to write smart contracts for the Tezos blockchain.
It abstracts away the complexity of using Michelson (the smart contract language directly available on-chain) to make it easier to write smart contracts on Tezos.
In this tutorial, you will learn how to:
Create a wallet to store cryptocurrency tokens
Get free tez tokens (the native cryptocurrency token on Tezos) from a faucet
Code a contract in LIGO, including:
Defining the storage for the contract
Defining entrypoints in the contract
Writing code to run when the entrypoints are called
Deploy (or originate) the contract to Tezos and set its starting storage value
Look up the current state of the contract
Call the contract
What is a smart contract?
A smart contract is a computer program that is stored on a blockchain and runs on a blockchain.
Because the blockchain is spread across many computer nodes, you don't have to think about where to host the program or worry whether a computer will run it or not.
Responsibility for running the contract is distributed across all of the nodes in the Tezos system, so when you deploy a smart contract, you can be confident that it will be available and unmodified when someone wants to run it.
A smart contract has these parts:
Persistent storage, data that the contract can read and write
One or more entrypoints, which are a kind of function that clients can call, like endpoints in an API or functions or methods in many programming languages
A Tezos account that can store tokens (technically, the contract is itself a type of Tezos account, but you can think of it as a program with a Tezos account)
Tutorial contract
The contract that you deploy in this tutorial stores a single integer.
It provides entrypoints that clients can call to change the value of that integer:
The increment entrypoint accepts an integer as a parameter and adds that integer to the value in storage
The decrement entrypoint accepts an integer as a parameter and subtracts that integer from the value in storage
The reset entrypoint takes no parameters and resets the value in storage to 0
After you deploy the contract, you or any other user can call it from various sources, including web applications, other contracts, and the Octez command-line client.
However, no one can prevent it from running or tamper with its code or its storage.
Creating and funding a wallet
To deploy and work with the contract, you need a wallet and some tez tokens.
You can get test tokens for free on the Ghostnet test network:
Install a Tezos-compatible wallet.
Which wallet you install is up to you and whether you want to install a wallet on your computer, in a browser extension, or as a mobile app.
If you don't know which one to choose, try the Temple browser extension.
Desktop wallets for Tezos include the Temple browser extension, Kukai, and Umami.
Mobile apps include Temple, Kukai, and Umami.
Switch the wallet to use the Ghostnet testnet instead of Tezos Mainnet.
Ghostnet is a network for testing Tezos applications where tokens are free so you don't have to spend real currency to work with your applications.
For example, for the Temple browser wallet, click Tezos Mainnet at the top and then click Ghostnet Testnet, as in this picture:
Selecting the Ghostnet testnet in the Temple wallet
From your wallet, get the address of your account, which starts with tz1.
This is the address that applications use to work with your wallet.
Go to the Ghostnet faucet page at https://faucet.ghostnet.teztnets.com.
On the faucet page, paste your wallet address into the input field labeled "Or fund any address" and click the button for the amount of tez to add to your wallet.
20 tez is enough to work with the tutorial contract, and you can return to the faucet later if you need more tez.
It may take a few minutes for the faucet to send the tokens and for those tokens to appear in your wallet.
You can use the faucet as much as you need to get tokens on the testnet, but those tokens are worthless and cannot be used on Mainnet.
Fund your wallet using the Ghostnet Faucet
Now you have an account and funds that you can use to work with Tezos.
Creating the contract
The contract that you will create has these basic parts:
A type that describes the contract's storage, in this case an integer.
The storage can be a primitive type such as an integer, string, or timestamp, or a complex data type that contains multiple values.
For more information on contract data types, see Data types.
Functions called entrypoints that run code when clients call the contract.
A type that describes the return value of the entrypoints.
Follow these steps to create the code for the contract:
Open the LIGO online IDE at https://ide.ligolang.org/.
You can work with LIGO code in any IDE, but this online IDE keeps you from having to install software on your computer, and it also simplifies the process of deploying contracts.
At the top right of the page, in the Network menu, select Ghostnet, as shown in this picture:
Selecting Ghostnet in the list of networks
Connect a wallet to the IDE:
At the top right of the page, click the Keypair Manager button.
In the Keypair Manager window, import the account that you created earlier or create and fund a new account to use with the IDE.
To import the account that you created earlier, export the private key from your wallet app, click Import in the Keypair Manager window, and paste the private key.
Now you can use your account in the IDE.
To create an account to use with the IDE, click Create in the Keypair Manager window, give the new keypair a name, and click Create.
Then, copy the address of the keypair and get tez from the faucet as you did in Creating and funding a wallet.
In the IDE, create a project from the empty template and select the CameLIGO syntax, as shown in this picture:
Summary
Now the contract is running on the Tezos blockchain.
You or any other user can call it from any source that can send transactions to Tezos, including Octez, dApps, and other contracts.
If you want to continue working with this contract, here are some ideas:
Change permissions for the contract so only your account can call its entrypoints
Add your own entrypoints and originate a new contract; note that you cannot update the existing contract after it is deployed
Create a dApp to call the contract from a web application, similar to the dApp that you create in the tutorial Build a simple web application
Deploy a smart contract with CameLIGO
This tutorial covers writing and deploying a simple smart contract with the LIGO programming language.
Specifically, this tutorial uses the CameLIGO version of LIGO, which has syntax similar to OCaml, but you don't need any experience with OCaml or LIGO to do this tutorial.
If you are more familiar with JavaScript, try Deploy a smart contract with JsLIGO.
If you are more familiar with Python, try Deploy a smart contract with SmartPy.
To learn the Archetype language, try Deploy a smart contract with Archetype.
LIGO is a high-level programming language that you can use to write smart contracts for the Tezos blockchain.
It abstracts away the complexity of using Michelson (the smart contract language directly available on-chain) to make it easier to write smart contracts on Tezos.
In this tutorial, you will learn how to:
Create a wallet to store cryptocurrency tokens
Get free tez tokens (the native cryptocurrency token on Tezos) from a faucet
Code a contract in LIGO, including:
Defining the storage for the contract
Defining entrypoints in the contract
Writing code to run when the entrypoints are called
Deploy (or originate) the contract to Tezos and set its starting storage value
Look up the current state of the contract
Call the contract
What is a smart contract?
A smart contract is a computer program that is stored on a blockchain and runs on a blockchain.
Because the blockchain is spread across many computer nodes, you don't have to think about where to host the program or worry whether a computer will run it or not.
Responsibility for running the contract is distributed across all of the nodes in the Tezos system, so when you deploy a smart contract, you can be confident that it will be available and unmodified when someone wants to run it.
A smart contract has these parts:
Persistent storage, data that the contract can read and write
One or more entrypoints, which are a kind of function that clients can call, like endpoints in an API or functions or methods in many programming languages
A Tezos account that can store tokens (technically, the contract is itself a type of Tezos account, but you can think of it as a program with a Tezos account)
Tutorial contract
The contract that you deploy in this tutorial stores a single integer.
It provides entrypoints that clients can call to change the value of that integer:
The increment entrypoint accepts an integer as a parameter and adds that integer to the value in storage
The decrement entrypoint accepts an integer as a parameter and subtracts that integer from the value in storage
The reset entrypoint takes no parameters and resets the value in storage to 0
After you deploy the contract, you or any other user can call it from various sources, including web applications, other contracts, and the Octez command-line client.
However, no one can prevent it from running or tamper with its code or its storage.
Creating and funding a wallet
To deploy and work with the contract, you need a wallet and some tez tokens.
You can get test tokens for free on the Ghostnet test network:
Install a Tezos-compatible wallet.
Which wallet you install is up to you and whether you want to install a wallet on your computer, in a browser extension, or as a mobile app.
If you don't know which one to choose, try the Temple browser extension.
Desktop wallets for Tezos include the Temple browser extension, Kukai, and Umami.
Mobile apps include Temple, Kukai, and Umami.
Switch the wallet to use the Ghostnet testnet instead of Tezos Mainnet.
Ghostnet is a network for testing Tezos applications where tokens are free so you don't have to spend real currency to work with your applications.
For example, for the Temple browser wallet, click Tezos Mainnet at the top and then click Ghostnet Testnet, as in this picture:
Selecting the Ghostnet testnet in the Temple wallet
From your wallet, get the address of your account, which starts with tz1.
This is the address that applications use to work with your wallet.
Go to the Ghostnet faucet page at https://faucet.ghostnet.teztnets.com.
On the faucet page, paste your wallet address into the input field labeled "Or fund any address" and click the button for the amount of tez to add to your wallet.
20 tez is enough to work with the tutorial contract, and you can return to the faucet later if you need more tez.
It may take a few minutes for the faucet to send the tokens and for those tokens to appear in your wallet.
You can use the faucet as much as you need to get tokens on the testnet, but those tokens are worthless and cannot be used on Mainnet.
Fund your wallet using the Ghostnet Faucet
Now you have an account and funds that you can use to work with Tezos.
Creating the contract
The contract that you will create has these basic parts:
A type that describes the contract's storage, in this case an integer.
The storage can be a primitive type such as an integer, string, or timestamp, or a complex data type that contains multiple values.
For more information on contract data types, see Data types.
Functions called entrypoints that run code when clients call the contract.
A type that describes the return value of the entrypoints.
Follow these steps to create the code for the contract:
Open the LIGO online IDE at https://ide.ligolang.org/.
You can work with LIGO code in any IDE, but this online IDE keeps you from having to install software on your computer, and it also simplifies the process of deploying contracts.
At the top right of the page, in the Network menu, select Ghostnet, as shown in this picture:
Selecting Ghostnet in the list of networks
Connect a wallet to the IDE:
At the top right of the page, click the Keypair Manager button.
In the Keypair Manager window, import the account that you created earlier or create and fund a new account to use with the IDE.
To import the account that you created earlier, export the private key from your wallet app, click Import in the Keypair Manager window, and paste the private key.
Now you can use your account in the IDE.
To create an account to use with the IDE, click Create in the Keypair Manager window, give the new keypair a name, and click Create.
Then, copy the address of the keypair and get tez from the faucet as you did in Creating and funding a wallet.
In the IDE, create a project from the empty template and select the CameLIGO syntax, as shown in this picture:
 The IDE creates a project and a contract file named Contract.mligo.
In the contract file, create a type to set the storage type to an integer:
Add this code to define the return type for the entrypoints.
Tezos entrypoints return two values: a list of other operations to call and the new value of the contract's storage.
Add the code for the increment and decrement entrypoints:
These functions begin with the @entry annotation to indicate that they are entrypoints.
They accept two parameters: the change in the storage value (an integer) and the current value of the storage (in the storage type that you created earlier in the code).
They return a value of the type returnValue that you created in the previous step.
Each function returns an empty list of other operations to call and the new value of the storage.
Add this code for the reset entrypoint:
This function is similar to the others, but it does not take the current value of the storage into account.
It always returns an empty list of operations and 0.
The complete contract code looks like this:
Testing and compiling the contract
Before you can deploy the contract to Tezos, you must compile it to Michelson, the base language of Tezos contracts.
Set the compiler to target the module to compile in your code:
On the left side of the page, under Actions, click Project Settings.
On the Project Settings tab, in the Module name field, set the module name to Counter.
Close the Project Settings tab.
Test the contract by passing parameters and the storage value to the LIGO dry-run command:
On the left side of the page, under Actions, click Dry Run.
In the Dry Run window, select the Increment entrypoint, set the input parameter to 32 and the storage to 10.
The Dry Run window looks like this:
The IDE creates a project and a contract file named Contract.mligo.
In the contract file, create a type to set the storage type to an integer:
Add this code to define the return type for the entrypoints.
Tezos entrypoints return two values: a list of other operations to call and the new value of the contract's storage.
Add the code for the increment and decrement entrypoints:
These functions begin with the @entry annotation to indicate that they are entrypoints.
They accept two parameters: the change in the storage value (an integer) and the current value of the storage (in the storage type that you created earlier in the code).
They return a value of the type returnValue that you created in the previous step.
Each function returns an empty list of other operations to call and the new value of the storage.
Add this code for the reset entrypoint:
This function is similar to the others, but it does not take the current value of the storage into account.
It always returns an empty list of operations and 0.
The complete contract code looks like this:
Testing and compiling the contract
Before you can deploy the contract to Tezos, you must compile it to Michelson, the base language of Tezos contracts.
Set the compiler to target the module to compile in your code:
On the left side of the page, under Actions, click Project Settings.
On the Project Settings tab, in the Module name field, set the module name to Counter.
Close the Project Settings tab.
Test the contract by passing parameters and the storage value to the LIGO dry-run command:
On the left side of the page, under Actions, click Dry Run.
In the Dry Run window, select the Increment entrypoint, set the input parameter to 32 and the storage to 10.
The Dry Run window looks like this:
 Click Run.
At the bottom of the window, the Result field shows the response (LIST_EMPTY(), 42).
This response means that the contract did not call any other contracts, so the list of operations is empty.
Then it shows the new value of the storage.
You can test the decrement function in the same way.
If you see any errors, make sure that the code of your contract matches the code in the previous section.
Test the Reset entrypoint in the same way, but pass unit as the input parameter and any integer in the storage field.
The Reset entrypoint takes no parameters, but technically it accepts the value unit, which means no parameter.
The Result field shows the response (LIST_EMPTY(), 0), which means that the storage value is now 0.
On the left side of the page, under Actions, click Compile, and in the Compile window, click Compile again.
If the compilation succeeds, the IDE prints the compiled code to the terminal and saves it to the file build/contracts/Contract.tz.
You can see the code by expanding your project on the left side of the page, under .workspaces, and double-clicking Contract.tz.
If you see error messages, verify that your contract code matches the code in the previous section.
Now you can deploy the contract.
Deploying (originating) to the testnet
Deploying a contract to the network is called "originating."
Originating the contract requires a small amount of Tezos tokens as a fee.
On the left side of the page, under Actions, click Deploy.
You may see a warning that the initial storage is not set.
You can ignore this warning because you can set the initial storage now.
In the Deploy contract window, in the Init storage field, set the initial value for the contract's storage to an integer.
In the Signer field, make sure your account is selected.
Click Estimate.
The window shows the estimated fees to deploy the contract, as in this picture:
Click Run.
At the bottom of the window, the Result field shows the response (LIST_EMPTY(), 42).
This response means that the contract did not call any other contracts, so the list of operations is empty.
Then it shows the new value of the storage.
You can test the decrement function in the same way.
If you see any errors, make sure that the code of your contract matches the code in the previous section.
Test the Reset entrypoint in the same way, but pass unit as the input parameter and any integer in the storage field.
The Reset entrypoint takes no parameters, but technically it accepts the value unit, which means no parameter.
The Result field shows the response (LIST_EMPTY(), 0), which means that the storage value is now 0.
On the left side of the page, under Actions, click Compile, and in the Compile window, click Compile again.
If the compilation succeeds, the IDE prints the compiled code to the terminal and saves it to the file build/contracts/Contract.tz.
You can see the code by expanding your project on the left side of the page, under .workspaces, and double-clicking Contract.tz.
If you see error messages, verify that your contract code matches the code in the previous section.
Now you can deploy the contract.
Deploying (originating) to the testnet
Deploying a contract to the network is called "originating."
Originating the contract requires a small amount of Tezos tokens as a fee.
On the left side of the page, under Actions, click Deploy.
You may see a warning that the initial storage is not set.
You can ignore this warning because you can set the initial storage now.
In the Deploy contract window, in the Init storage field, set the initial value for the contract's storage to an integer.
In the Signer field, make sure your account is selected.
Click Estimate.
The window shows the estimated fees to deploy the contract, as in this picture:
 Click Deploy.
The deployment process can take a few minutes.
When the contract is deployed, the Deploy contract window shows the address at the bottom of the window.
Copy the address of the deployed contract, which starts with KT1.
:::warning
Copy the contract address now, because it will not be shown again.
:::
Now you can call the contract from any Tezos client, including web applications and command-line applications like The Octez client.
Calling the contract
These steps show you how to inspect the contract with a block explorer, which is a web application that shows information about Tezos.
It also allows you to call the contract.
Open the block explorer Better Call Dev at this link: https://better-call.dev/
Paste the address of the contract in the search field and press Enter.
The block explorer shows information about the contract, including recent transactions and the current state of its storage.
Try calling one of the entrypoints:
Go to the Storage tab and check the current state of the storage, which should be the integer that you put in the Deploy window.
Go to the Interact tab.
This tab shows the entrypoints in the contract and lets you use them.
For the increment entrypoint, in the Parameters section, put an integer in the field, as shown in this image:
Click Execute and then click Wallet.
Select your wallet and connect it to the application.
Confirm the transaction in your wallet.
Wait for a success message that says "The transaction has successfully been broadcasted to the network."
Go back to the Storage tab and see the new value of the storage, as in this picture:
Summary
Now the contract is running on the Tezos blockchain.
You or any other user can call it from any source that can send transactions to Tezos, including Octez, dApps, and other contracts.
If you want to continue working with this contract, here are some ideas:
Change permissions for the contract so only your account can call its entrypoints
Add your own entrypoints and originate a new contract; note that you cannot update the existing contract after it is deployed
Create a dApp to call the contract from a web application, similar to the dApp that you create in the tutorial Build a simple web application
Deploy a smart contract with SmartPy
This tutorial covers writing and deploying a simple smart contract with the SmartPy programming language.
SmartPy has syntax similar to Python, but you don't need any experience with Python or SmartPy to do this tutorial.
If you are more familiar with OCaml, try Deploy a smart contract with CameLIGO.
If you are more familiar with JavaScript, try Deploy a smart contract with JsLIGO.
To learn the Archetype language, try Deploy a smart contract with Archetype.
SmartPy is a high-level programming language that you can use to write smart contracts for the Tezos blockchain.
It abstracts away the complexity of using Michelson (the smart contract language directly available on-chain) to make it easier to write smart contracts on Tezos.
In this tutorial, you will learn how to:
Create a wallet to store cryptocurrency tokens
Get free tez tokens (the native cryptocurrency token on Tezos) from a faucet
Code a contract in SmartPy, including:
Creating a contract in the online IDE
Defining the storage for the contract
Defining entrypoints in the contract
Writing code to run when the entrypoints are called
Deploy (or originate) the contract to Tezos and set its starting storage value
Look up the current state of the contract
Call the contract
What is a smart contract?
A smart contract is a computer program that is stored on a blockchain and runs on a blockchain.
Because the blockchain is spread across many computer nodes, you don't have to think about where to host the program or worry whether a computer will run it or not.
Responsibility for running the contract is distributed across all of the nodes in the Tezos system, so when you deploy a smart contract, you can be confident that it will be available and unmodified when someone wants to run it.
A smart contract has these parts:
Persistent storage, data that the contract can read and write
One or more entrypoints, which are a kind of function that clients can call, like endpoints in an API or functions or methods in many programming languages
A Tezos account that can store tokens (technically, the contract is itself a type of Tezos account, but you can think of it as a program with a Tezos account)
Tutorial contract
The contract that you deploy in this tutorial stores a string value.
It provides entrypoints that clients can call to change the value of that string:
The replace entrypoint accepts a new string as a parameter and stores that string, replacing the existing string.
The append entrypoint accepts a new string as a parameter and appends it to the existing string.
After you deploy the contract, you or any other user can call it from various sources, including web applications, other contracts, and the Octez command-line client.
However, no one can prevent it from running or tamper with its code or its storage.
Creating and funding a wallet
To deploy and work with the contract, you need a wallet and some tez tokens.
Install a Tezos-compatible wallet.
Which wallet you install is up to you and whether you want to install a wallet on your computer, in a browser extension, or as a mobile app.
If you don't know which one to choose, try the Temple browser extension.
Desktop wallets for Tezos include the Temple browser extension, Kukai, and Umami.
Mobile apps include Temple, Kukai, and Umami.
Switch the wallet to use the Ghostnet testnet instead of Tezos Mainnet.
Ghostnet is a network for testing Tezos applications where tokens are free so you don't have to spend real currency to work with your applications.
For example, for the Temple browser wallet, click Tezos Mainnet at the top and then click Ghostnet Testnet, as in this picture:
Selecting the Ghostnet testnet in the Temple wallet
From your wallet, get the address of your account, which starts with tz1.
This is the address that applications use to work with your wallet.
Go to the Ghostnet faucet page at https://faucet.ghostnet.teztnets.com.
On the faucet page, paste your wallet address into the input field labeled "Or fund any address" and click the button for the amount of tez to add to your wallet.
20 tez is enough to work with the tutorial contract, and you can return to the faucet later if you need more tez.
It may take a few minutes for the faucet to send the tokens and for those tokens to appear in your wallet.
You can use the faucet as much as you need to get tokens on the testnet, but those tokens are worthless and cannot be used on Mainnet.
Fund your wallet using the Ghostnet Faucet
Now you have an account and funds that you can use to work with Tezos.
Creating the contract
The contract that you will create has these basic parts:
A function that initializes the contract and sets the starting value for its storage.
Internal functions called entrypoints that run code when clients call the contract.
Automated tests that verify that the contract works as expected.
Follow these steps to create the code for the contract:
Open the SmartPy online IDE at https://smartpy.io/ide.
You can work with SmartPy code in any IDE, but this online IDE keeps you from having to install software on your computer, and it also simplifies the process of deploying contracts.
In the code editor, add this line of code to import SmartPy:
Add this code that creates the entrypoints:
Indentation is significant in Python, so make sure that your indentation matches this code.
The first two lines create a SmartPy module, which indicates that the code is SmartPy instead of ordinary Python.
Then the code creates a class named StoreGreeting, which represents the smart contract.
The contract has an __init__ function, which runs when the contract is deployed.
In this case, the function sets the initial value of the storage to a parameter that you pass when you deploy the contract.
This storage value is a string, but the storage can be another primitive type such as an integer or timestamp, or a complex data type that contains multiple values.
For more information on contract data types, see Data types.
Add this code, which creates automated tests:
When you run the SmartPy file, SmartPy runs a simulation in which it tests and compiles the contract.
In this case, the tests verify that the replace and append endpoints work.
For more information about SmartPy and tests, see the SmartPy documentation.
The SmartPy online IDE looks like this:
The SmartPy online IDE, including the code for the contract
The complete contract looks like this:
Testing and compiling the contract
Before you can deploy the contract to Tezos, you must compile it to Michelson, the base language of Tezos contracts.
The compilation process automatically runs the tests.
Compile the contract and run the tests by clicking the Run Code button:
The right-hand pane of the online IDE shows the results of the simulation, compilation, and testing process.
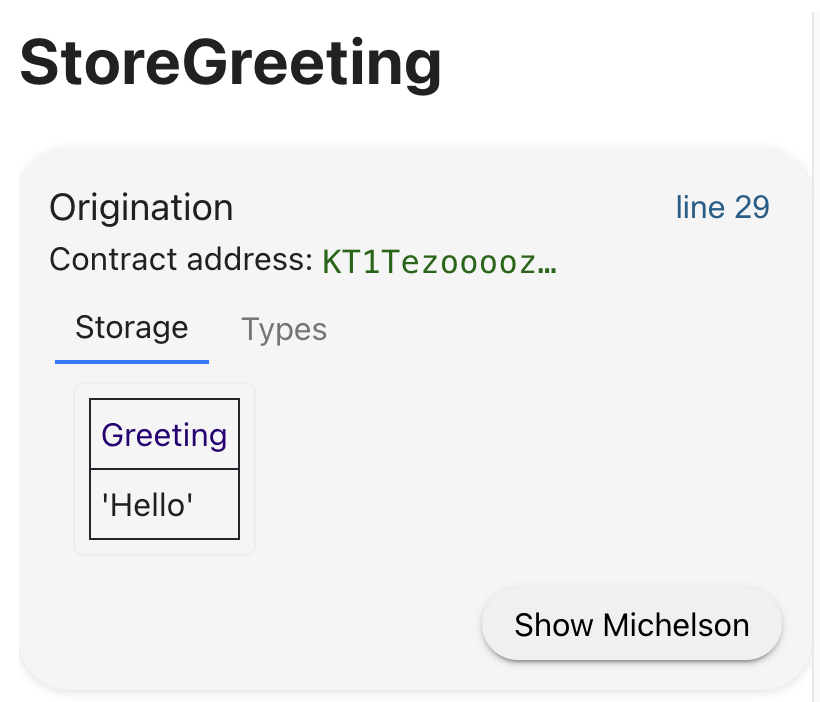
The first step is simulating the deployment (origination) of the contract.
The simulation assigns the contract a temporary address and shows the initial state of its storage:
Click Deploy.
The deployment process can take a few minutes.
When the contract is deployed, the Deploy contract window shows the address at the bottom of the window.
Copy the address of the deployed contract, which starts with KT1.
:::warning
Copy the contract address now, because it will not be shown again.
:::
Now you can call the contract from any Tezos client, including web applications and command-line applications like The Octez client.
Calling the contract
These steps show you how to inspect the contract with a block explorer, which is a web application that shows information about Tezos.
It also allows you to call the contract.
Open the block explorer Better Call Dev at this link: https://better-call.dev/
Paste the address of the contract in the search field and press Enter.
The block explorer shows information about the contract, including recent transactions and the current state of its storage.
Try calling one of the entrypoints:
Go to the Storage tab and check the current state of the storage, which should be the integer that you put in the Deploy window.
Go to the Interact tab.
This tab shows the entrypoints in the contract and lets you use them.
For the increment entrypoint, in the Parameters section, put an integer in the field, as shown in this image:
Click Execute and then click Wallet.
Select your wallet and connect it to the application.
Confirm the transaction in your wallet.
Wait for a success message that says "The transaction has successfully been broadcasted to the network."
Go back to the Storage tab and see the new value of the storage, as in this picture:
Summary
Now the contract is running on the Tezos blockchain.
You or any other user can call it from any source that can send transactions to Tezos, including Octez, dApps, and other contracts.
If you want to continue working with this contract, here are some ideas:
Change permissions for the contract so only your account can call its entrypoints
Add your own entrypoints and originate a new contract; note that you cannot update the existing contract after it is deployed
Create a dApp to call the contract from a web application, similar to the dApp that you create in the tutorial Build a simple web application
Deploy a smart contract with SmartPy
This tutorial covers writing and deploying a simple smart contract with the SmartPy programming language.
SmartPy has syntax similar to Python, but you don't need any experience with Python or SmartPy to do this tutorial.
If you are more familiar with OCaml, try Deploy a smart contract with CameLIGO.
If you are more familiar with JavaScript, try Deploy a smart contract with JsLIGO.
To learn the Archetype language, try Deploy a smart contract with Archetype.
SmartPy is a high-level programming language that you can use to write smart contracts for the Tezos blockchain.
It abstracts away the complexity of using Michelson (the smart contract language directly available on-chain) to make it easier to write smart contracts on Tezos.
In this tutorial, you will learn how to:
Create a wallet to store cryptocurrency tokens
Get free tez tokens (the native cryptocurrency token on Tezos) from a faucet
Code a contract in SmartPy, including:
Creating a contract in the online IDE
Defining the storage for the contract
Defining entrypoints in the contract
Writing code to run when the entrypoints are called
Deploy (or originate) the contract to Tezos and set its starting storage value
Look up the current state of the contract
Call the contract
What is a smart contract?
A smart contract is a computer program that is stored on a blockchain and runs on a blockchain.
Because the blockchain is spread across many computer nodes, you don't have to think about where to host the program or worry whether a computer will run it or not.
Responsibility for running the contract is distributed across all of the nodes in the Tezos system, so when you deploy a smart contract, you can be confident that it will be available and unmodified when someone wants to run it.
A smart contract has these parts:
Persistent storage, data that the contract can read and write
One or more entrypoints, which are a kind of function that clients can call, like endpoints in an API or functions or methods in many programming languages
A Tezos account that can store tokens (technically, the contract is itself a type of Tezos account, but you can think of it as a program with a Tezos account)
Tutorial contract
The contract that you deploy in this tutorial stores a string value.
It provides entrypoints that clients can call to change the value of that string:
The replace entrypoint accepts a new string as a parameter and stores that string, replacing the existing string.
The append entrypoint accepts a new string as a parameter and appends it to the existing string.
After you deploy the contract, you or any other user can call it from various sources, including web applications, other contracts, and the Octez command-line client.
However, no one can prevent it from running or tamper with its code or its storage.
Creating and funding a wallet
To deploy and work with the contract, you need a wallet and some tez tokens.
Install a Tezos-compatible wallet.
Which wallet you install is up to you and whether you want to install a wallet on your computer, in a browser extension, or as a mobile app.
If you don't know which one to choose, try the Temple browser extension.
Desktop wallets for Tezos include the Temple browser extension, Kukai, and Umami.
Mobile apps include Temple, Kukai, and Umami.
Switch the wallet to use the Ghostnet testnet instead of Tezos Mainnet.
Ghostnet is a network for testing Tezos applications where tokens are free so you don't have to spend real currency to work with your applications.
For example, for the Temple browser wallet, click Tezos Mainnet at the top and then click Ghostnet Testnet, as in this picture:
Selecting the Ghostnet testnet in the Temple wallet
From your wallet, get the address of your account, which starts with tz1.
This is the address that applications use to work with your wallet.
Go to the Ghostnet faucet page at https://faucet.ghostnet.teztnets.com.
On the faucet page, paste your wallet address into the input field labeled "Or fund any address" and click the button for the amount of tez to add to your wallet.
20 tez is enough to work with the tutorial contract, and you can return to the faucet later if you need more tez.
It may take a few minutes for the faucet to send the tokens and for those tokens to appear in your wallet.
You can use the faucet as much as you need to get tokens on the testnet, but those tokens are worthless and cannot be used on Mainnet.
Fund your wallet using the Ghostnet Faucet
Now you have an account and funds that you can use to work with Tezos.
Creating the contract
The contract that you will create has these basic parts:
A function that initializes the contract and sets the starting value for its storage.
Internal functions called entrypoints that run code when clients call the contract.
Automated tests that verify that the contract works as expected.
Follow these steps to create the code for the contract:
Open the SmartPy online IDE at https://smartpy.io/ide.
You can work with SmartPy code in any IDE, but this online IDE keeps you from having to install software on your computer, and it also simplifies the process of deploying contracts.
In the code editor, add this line of code to import SmartPy:
Add this code that creates the entrypoints:
Indentation is significant in Python, so make sure that your indentation matches this code.
The first two lines create a SmartPy module, which indicates that the code is SmartPy instead of ordinary Python.
Then the code creates a class named StoreGreeting, which represents the smart contract.
The contract has an __init__ function, which runs when the contract is deployed.
In this case, the function sets the initial value of the storage to a parameter that you pass when you deploy the contract.
This storage value is a string, but the storage can be another primitive type such as an integer or timestamp, or a complex data type that contains multiple values.
For more information on contract data types, see Data types.
Add this code, which creates automated tests:
When you run the SmartPy file, SmartPy runs a simulation in which it tests and compiles the contract.
In this case, the tests verify that the replace and append endpoints work.
For more information about SmartPy and tests, see the SmartPy documentation.
The SmartPy online IDE looks like this:
The SmartPy online IDE, including the code for the contract
The complete contract looks like this:
Testing and compiling the contract
Before you can deploy the contract to Tezos, you must compile it to Michelson, the base language of Tezos contracts.
The compilation process automatically runs the tests.
Compile the contract and run the tests by clicking the Run Code button:
The right-hand pane of the online IDE shows the results of the simulation, compilation, and testing process.
The first step is simulating the deployment (origination) of the contract.
The simulation assigns the contract a temporary address and shows the initial state of its storage:
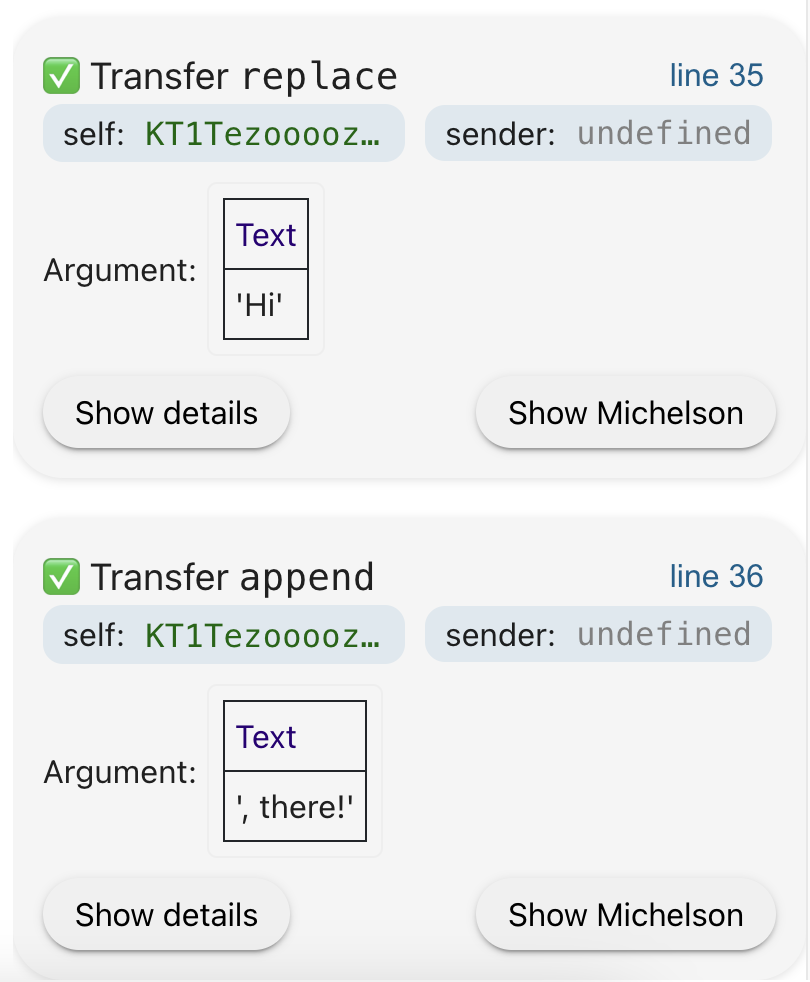
 Then, the simulation runs the test cases and shows the results of each call to an entrypoint:
 Deploying (originating) to the testnet
Deploying a contract to the network is called "originating."
Originating the contract requires a small amount of Tezos tokens as a fee.
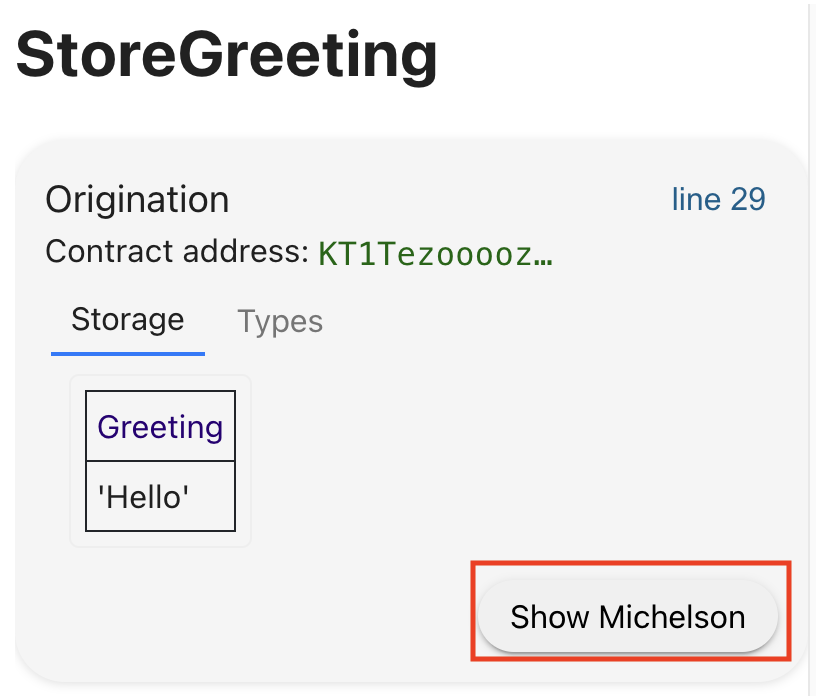
Under the origination step, click Show Michelson.
Deploying (originating) to the testnet
Deploying a contract to the network is called "originating."
Originating the contract requires a small amount of Tezos tokens as a fee.
Under the origination step, click Show Michelson.
 The IDE shows the compiled Michelson code of the contract, which is the language that smart contracts use on Tezos.
Below the Michelson code, click Deploy Contract.
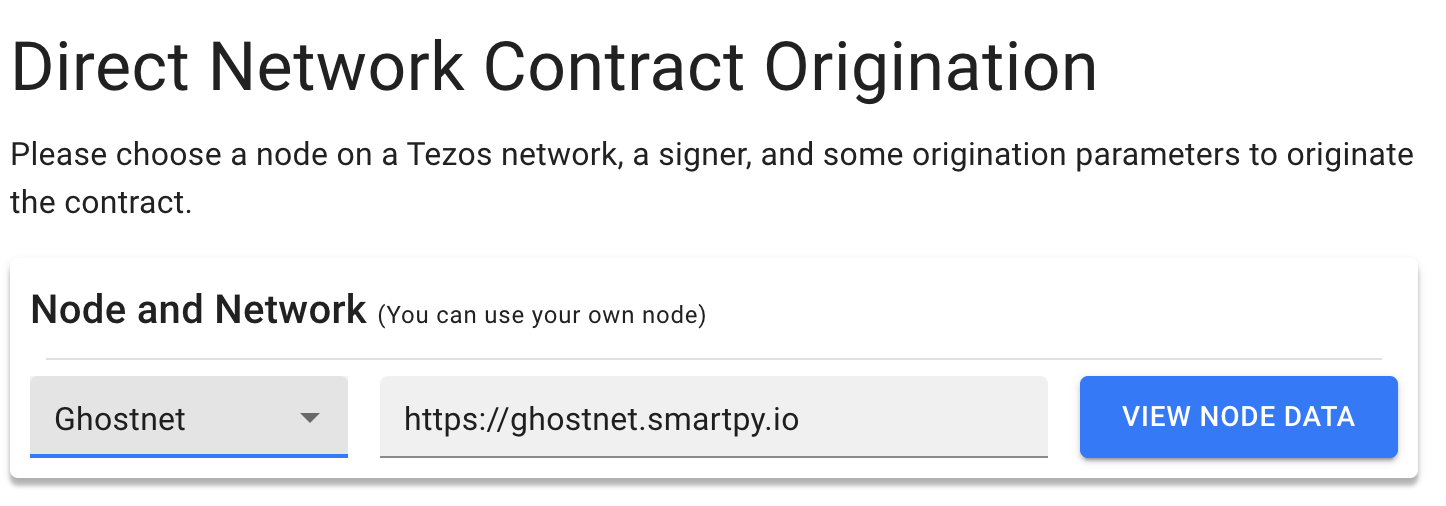
In the new window, under "Node and Network," select the Ghostnet testnet and accept the default RPC node, as in this picture:
The IDE shows the compiled Michelson code of the contract, which is the language that smart contracts use on Tezos.
Below the Michelson code, click Deploy Contract.
In the new window, under "Node and Network," select the Ghostnet testnet and accept the default RPC node, as in this picture:
 Under "Wallet," click Select Account.
In the pop-up window, connect your wallet.
For Temple wallets, use the Temple tab, and for most other wallets, use the Beacon tab.
When your wallet is connected, click Validate.
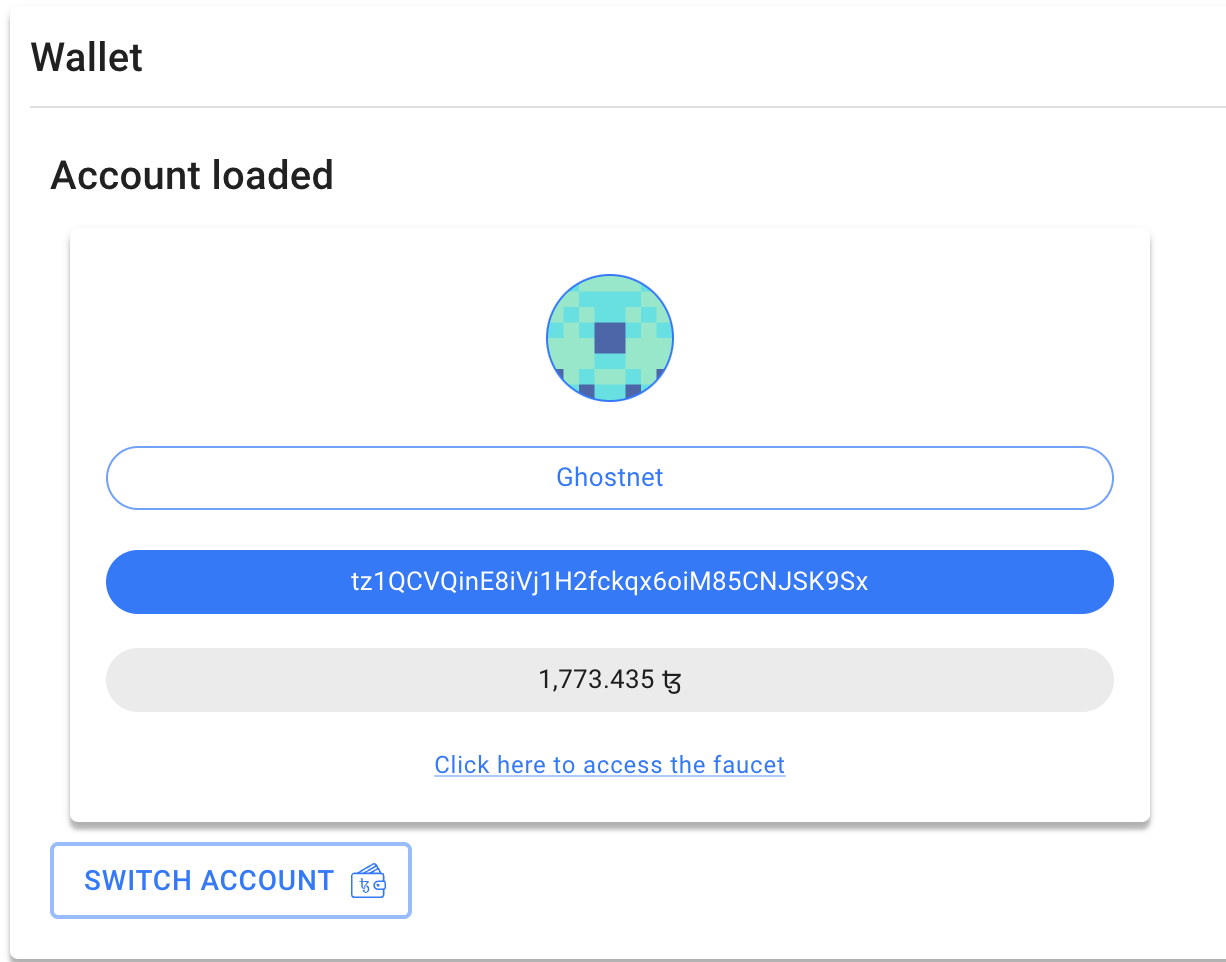
The Origination page shows your wallet information:
Under "Wallet," click Select Account.
In the pop-up window, connect your wallet.
For Temple wallets, use the Temple tab, and for most other wallets, use the Beacon tab.
When your wallet is connected, click Validate.
The Origination page shows your wallet information:
 At the bottom of the page, click Deploy Contract.
In the pop-up window, click Accept.
Approve the transaction in your wallet app.
The "Origination Result" section shows information about the deployed contract, including its address:
At the bottom of the page, click Deploy Contract.
In the pop-up window, click Accept.
Approve the transaction in your wallet app.
The "Origination Result" section shows information about the deployed contract, including its address:
 Under the contract address, click Save Contract.
In the popup window, give the contract a name and click Add Contract.
Saving the contract address like this is important because the address is not shown again.
Open the contract in the block explorer Better Call Dev:
In a new browser tab, go to https://better-call.dev/.
Paste the contract address in the search box and press Enter.
The block explorer shows information about the contract, including recent transactions and the current state of its storage.
Try calling one of the entrypoints:
Go to the Storage tab and check the current state of the storage.
If you just originated the contract, the storage is "Hello" because that's the value set in the smart contract code.
Go to the Interact tab.
This tab shows the entrypoints in the contract and lets you use them.
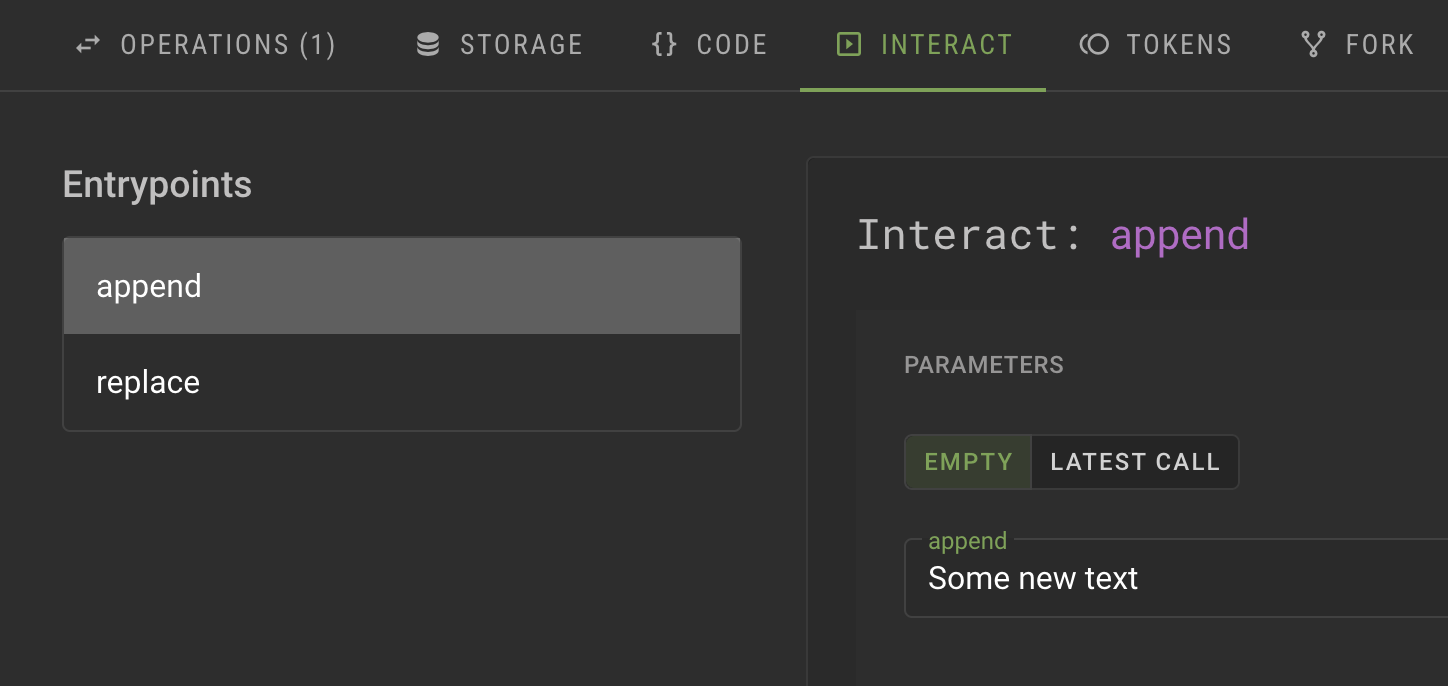
For the append entrypoint, in the Parameters section, put some text in the field, as shown in this image:
Under the contract address, click Save Contract.
In the popup window, give the contract a name and click Add Contract.
Saving the contract address like this is important because the address is not shown again.
Open the contract in the block explorer Better Call Dev:
In a new browser tab, go to https://better-call.dev/.
Paste the contract address in the search box and press Enter.
The block explorer shows information about the contract, including recent transactions and the current state of its storage.
Try calling one of the entrypoints:
Go to the Storage tab and check the current state of the storage.
If you just originated the contract, the storage is "Hello" because that's the value set in the smart contract code.
Go to the Interact tab.
This tab shows the entrypoints in the contract and lets you use them.
For the append entrypoint, in the Parameters section, put some text in the field, as shown in this image:
 Click Execute and then click Wallet.
Select your wallet and connect it to the application.
Confirm the transaction in your wallet.
Wait for a success message that says "The transaction has successfully been broadcasted to the network."
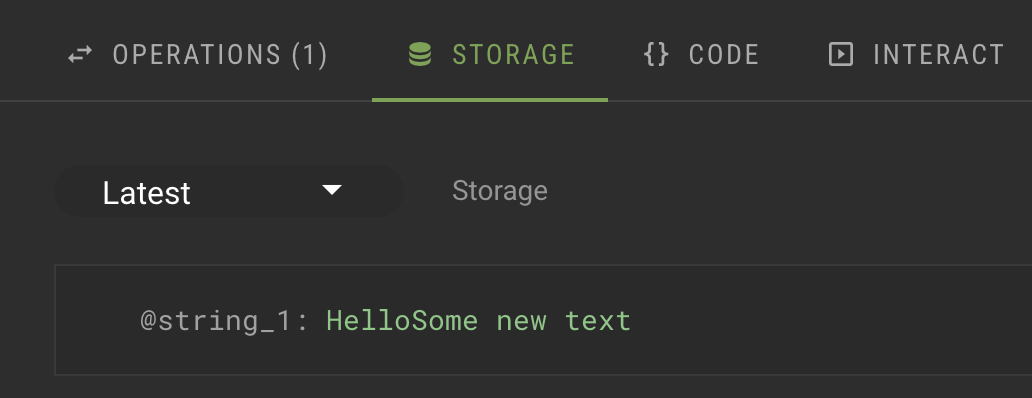
Go back to the Storage tab and see that the text that you put in the parameter has been added to the contract storage, as in this picture:
Click Execute and then click Wallet.
Select your wallet and connect it to the application.
Confirm the transaction in your wallet.
Wait for a success message that says "The transaction has successfully been broadcasted to the network."
Go back to the Storage tab and see that the text that you put in the parameter has been added to the contract storage, as in this picture:
 Summary
Now the contract is running on the Tezos blockchain.
You or any other user can call it from any source that can send transactions to Tezos, including Octez, dApps, and other contracts.
If you want to continue working with this contract, here are some ideas:
Change permissions for the contract so only your account can call its entrypoints
Add your own entrypoints and originate a new contract; note that you cannot update the existing contract after it is deployed
Create a dApp to call the contract from a web application, similar to the dApp that you create in the tutorial Build a simple web application
Deploy a smart contract with Archetype
This tutorial covers writing a smart contract and deploying it to Tezos in the Archetype programming language.
It uses the completium-cli command-line tool, which lets you work with Archetype contracts and Tezos from the command line.
If you are more familiar with Python, try Deploy a smart contract with SmartPy.
If you are more familiar with OCaml, try Deploy a smart contract with CameLIGO.
If you are more familiar with JavaScript, try Deploy a smart contract with JsLIGO.
In this tutorial, you will learn how to:
Create a wallet to store cryptocurrency tokens
Get free tez tokens (the native cryptocurrency token on Tezos) from a faucet
Code a contract in Archetype, including:
Defining the storage for the contract and its initial value
Defining entrypoints in the contract
Writing code to run when the entrypoints are called
Deploy (or originate) the contract to Tezos
Look up the current state of the contract
Call the contract from the command line
What is a smart contract?
A smart contract is a computer program that is stored on a blockchain and runs on a blockchain.
Because the blockchain is spread across many computer nodes, you don't have to think about where to host the program or worry whether a computer will run it or not.
Responsibility for running the contract is distributed across all of the nodes in the Tezos system, so when you deploy a smart contract, you can be confident that it will be available and unmodified when someone wants to run it.
A smart contract has these parts:
Persistent storage, data that the contract can read and write
One or more entrypoints, which are a kind of function that clients can call, like endpoints in an API or functions or methods in many programming languages
A Tezos account that can store tokens (technically, the contract is itself a type of Tezos account, but you can think of it as a program with a Tezos account)
The Archetype language
Archetype is a high-level language designed specifically for writing Tezos smart contracts.
It has features that help you write smart contracts, including:
Clear syntax that maps closely with how smart contracts work
Enhancements that simplify working with storage
Tools that help you verify conditions before running code, such as ensuring that the caller is authorized to run the entrypoint
The ability to set up a contract as a state machine, which gives the contract a state and manages transitions between states
The ability to verify that the contract does what it says it does through the process of formal verification
Like the other languages that Tezos accepts, Archetype code is compiled to Michelson to run on the blockchain.
For more information about Archetype, see https://archetype-lang.org/.
Tutorial contract
The contract that you deploy in this tutorial stores a single integer.
It provides entrypoints that clients can call to change the value of that integer:
The increment entrypoint accepts an integer as a parameter and adds that integer to the value in storage
The decrement entrypoint accepts an integer as a parameter and subtracts that integer from the value in storage
The reset entrypoint takes no parameters and resets the value in storage to 0
After you deploy the contract, you or any other user can call it from various sources, including web applications, other contracts, and the Octez command-line client.
However, no one can prevent it from running or tamper with its code or its storage.
Prerequisites
To run this tutorial, you need the completium-cli program:
Make sure that NPM is installed by running this command in your command-line terminal:
If NPM is not installed, install Node.JS on your computer, which includes NPM, from this link: https://nodejs.org/en.
Install completium-cli by running this command:
You can verify that completium-cli installed by running this command:
If you see a message with the version of completium-cli, it is installed correctly.
Initialize completium-cli by running this command:
Using a testnet
Before you deploy your contract to the main Tezos network (referred to as Mainnet), you can deploy it to a testnet.
Testnets are useful for testing Tezos operations because testnets provide tokens for free so you can work with them without spending real tokens.
Tezos testnets are listed on this site: https://teztnets.com/.
The Ghostnet testnet is a good choice for testing because it is intended to be long-lived, as opposed to shorter-term testnets that allow people to test new Tezos features.
By default, completium-cli uses Ghostnet, but these steps verify the network:
Verify that completium-cli is set to use Ghostnet by running this command:
The response shows the RPC endpoint that completium-cli is using, which is its access point to the Tezos network.
If the response shows Current network: ghost, it is using Ghostnet.
If completium-cli is not using Ghostnet, switch to Ghostnet by running this command, selecting any endpoint labeled "ghost," and pressing Enter:
Creating a local wallet
Deploying and using a smart contract costs fees, so you need a local wallet and XTZ tokens.
You could use the default accounts that are included in completium-cli, but follow these steps to create your own local wallet on a test network:
Run the following command to generate a local wallet, replacing local_wallet with a name for your wallet:
Switch to the account that you created by running this command, selecting the new account, and pressing Enter:
Get the address for the wallet by running this command:
The result shows the address of the account, which begins with "tz1".
You need the wallet address to send funds to the wallet, to deploy the contract, and to send transactions to the contract.
Copy the address for the account, which is labeled as the "public key hash" in the response to the previous command.
The address starts with "tz1".
On the testnets page at https://teztnets.com/, click the faucet link for the Ghostnet testnet, which is at https://faucet.ghostnet.teztnets.com.
On the faucet page, paste your wallet address into the input field labeled "Or fund any address" and click the button for the amount of XTZ to add to your wallet.
1 XTZ is enough for the tutorial.
It may take a few minutes for the faucet to send the tokens and for those tokens to appear in your wallet.
You can use the faucet as much as you need to get tokens on the testnet, but those tokens are worthless and cannot be used on Mainnet.
Fund your wallet using the Ghostnet Faucet
Run this command to check the balance of your wallet:
If your wallet is set up correctly and the faucet has sent tokens to it, the response includes the balance of your wallet.
Create the contract
The contract that you will create has these basic parts:
A variable that represents the contract's storage, in this case an integer.
Contracts can have storage in the form of primitive types such as an integer, string, or timestamp, or a complex data type that contains multiple values.
For more information on contract data types, see Data types.
Internal functions called entrypoints that run code when clients call the contract.
Follow these steps to create the code for the contract:
Run this command to create the contract file:
Open the counter.arl file in any text editor.
At the top of the file, name the contract by putting the name after the archetype keyword:
Define the storage for the contract by adding this line:
This line creates a variable in the contract's storage with the name "value."
It is an integer type and has the initial value of 10.
Any variables that you create with the variable keyword at the top level of the contract become part of its persistent storage.
Add the code for the increment and decrement entrypoints:
These functions begin with the entry keyword to indicate that they are entrypoints.
They accept one parameter: the change in the storage value, which is an integer named delta.
One function adds the parameter to the value of the value variable and the other subtracts it.
Add this code for the reset entrypoint:
This function is similar to the others, but it does not take a parameter.
It always sets the value variable to 0.
The complete contract code looks like this:
Deploying (originating) to the testnet
Deploying a contract to the network is called "originating."
Originating the contract requires a small amount of Tezos tokens as a fee.
Run the following command to originate the smart contract:
The command line shows information about the transaction, including the name of the originating account, the target network, and the cost to deploy it.
By default, it uses the local alias "Counter" to refer to the contract.
Press Y to confirm and deploy the contract.
If you see an error that includes the message contract.counter_in_the_past, you waited too long before pressing Y.
Run the deploy command again and promptly press Y to confirm it.
Print information about the contract by running this command:
The response shows information about the contract, including its address on Ghostnet, which starts with "KT1".
You can use this information to look up the contract on a block explorer.
Verify that the contract deployed successfully by finding it on a block explorer:
Open a Tezos block explorer such as TzKT or Better Call Dev.
Set the explorer to Ghostnet instead of Mainnet.
Paste the contract address, which starts with KT1, into the search field and press Enter.
Go to the Storage tab to see that the initial value of the storage is 10.
Run this command to see the current value of the contract storage:
Calling the contract
Now you can call the contract from any Tezos client, including completium-cli.
To increment the current storage by a certain value, call the increment entrypoint, as in this example:
To decrement the storage, call the decrement entrypoint, as in this example:
Finally, to reset the current storage to zero, call the reset entrypoint, as in this example:
Then, you can verify the updated storage on the block explorer or by running the completium-cli show storage Counter command.
Summary
Now the contract is running on the Tezos blockchain.
You or any other user can call it from any source that can send transactions to Tezos, including command-line clients, dApps, and other contracts.
If you want to continue working with this contract, here are some ideas:
Change permissions for the contract so only your account can call its entrypoints
Add your own entrypoints and originate a new contract; note that you cannot update the existing contract after it is deployed
Create a dApp to call the contract from a web application, similar to the dApp that you create in the tutorial Build a simple web application
Mint NFTs from a web app
This tutorial shows you how to create a web application that interacts with the Tezos blockchain to mint non-fungible tokens (NFTs). NFTs are unique digital assets that can represent art, collectibles, or virtually any kind of digital content on the blockchain. Specifically, this application will be the user-facing web front end for a smart contract that performs operations such as mint.
You will learn:
How to create a web application and import JavaScript libraries that access Tezos blockchain
How to call a smart contract from a web application
How to connect to a user's wallet
How to mint NFTs on behalf of a user
:::note
This tutorial covers creating a web application to interact with Tezos and mint NFTs.
For simplicity, it uses an existing backend application, a smart contract running on Tezos.
To create your own NFTs in a production application, you must deploy your own smart contract and backend application.
For a tutorial that covers creating both the frontend and backend application, see Create a contract and web app that mints NFTs.
:::
Prerequisites
This tutorial uses JavaScript, so it will be easier if you are familiar with JavaScript.
You do not need any familiarity with any of the libraries in the tutorial, including Taquito, a JavaScript library that helps developers access Tezos.
Before start creating this dApp, we will need a wallet and some ghostnet tez(ꜩ).
The smart contract
The backbone of this application is the smart contract deployed on the Tezos blockchain. The contract we'll be using is already deployed and is written in SmartPy. It defines the rules and processes for interactions with the Tezos blockchain, such as minting NFTs. All you need to do is integrate it into your web app.
You can view the contract in a block explorer such as this one: https://better-call.dev/ghostnet/KT1Lr8m7HgfY5UF6nXDDcXDxDgEmKyMeds1b/operations
The source code of the contract is here: https://github.com/trilitech/tutorial-applications/blob/main/simple-nft-svelte/contract/simple-nft.py
The tutorial application
In this tutorial, you build a web application that allows users to mint NFTs via the smart contract.
The interface of the application will look like this:
Mint UI
The application can perform many individual actions, including:
Connecting and disconnecting users' wallets
Displaying users' information, including their wallet address and tez balance
Allowing users to mint NFTs on the Tezos blockchain
The application is based on JavaScript, so it uses several JS and TS-based tools to build and package the application:
Svelte for the JavaScript framework
JavaScript to make the JavaScript code safer and more expressive
Vite (pronounced like veet) to bundle the application and provide the libraries to the user's browser
Also, to access the user's wallet and run transactions on Tezos, the application uses these libraries:
Taquito to interact with the Tezos blockchain
Beacon to access users' wallets
You can see the completed tutorial application here: https://github.com/trilitech/tutorial-applications/tree/main/simple-nft-svelte
When you're ready, move to the next section to begin setting up the application.
"Part 1: Setting up the application"
You can access Tezos through any JavaScript framework.
This tutorial uses the Svelte framework, and the following steps show you how to start a Svelte application and add the Tezos-related dependencies.
If you are familiar with Svelte, note that this application includes its own Svelte SPA, so it does not require SvelteKit.
Setting up the app
Run these commands to install Svelte with JavaScript and Vite:
Install the Tezos-related dependencies:
Install the buffer, events, and vite-compatible-readable-stream libraries:
Install a plugin to handle SASS styling for the site:
Update the vite.config.js file to the following code:
This updated file includes these changes to the default Vite configuration:
It sets the global object to {} so the application can provide the value for this object in the HTML file
It includes the a path to the Beacon SDK
It provides polyfills for readable-stream and stream
Update the default HTML file, index.html, to the following code:
This updated file sets the global variable to globalThis and adds a buffer object to the window.
The Beacon SDK requires this configuration to run in a Vite app.
File structure
The final structure of the tutorial application will look like this:
Here are descriptions for each of these files:
assets -> Contains the favicon and other static files such as images for the application.
lib -> Contains the components that make up the app interface:
app.css -> Contains global styles that apply to the entire app.
App.svelte -> The entrypoint of the application, which contains the components that are bundled into the final application.
main.js -> Where the JavaScript for the app is bundled before being injected into the HTML file.
vite-env.d.ts -> A JavaScript declaration file automatically generated by Vite to provide type definitions for environment variables.
index.html -> Contains the root element where the Svelte app gets attached.
jsconfig.json ->
package.json -> Contains metadata about the project like its name, version, and dependencies.
svelte.config.js -> Configuration file for the Svelte application.
vite.config.js -> Used to customize Vite's behavior, including defining plugins, setting up aliases, and more.
Importing the style sheets
These steps set up the style sheets for the application:
In the src/main.js file, import the style sheets by replacing the default code of the file with this code:
This code targets the body tag to inject the HTML produced by JavaScript instead of a div tag inside the body tag as Svelte apps do by default.
Your applications can target any tag on the page.
Configuring Svelte
Svelte files include several different types of code in a single file.
The files you will create have separate sections for JavaScript, style, and HTML code, as in this example:
Svelte components are fully contained, which means that the style and JS/TS code that you apply inside a component doesn't leak into the other components of your app.
Styles and scripts that are shared among components typically go in the src/styles and scripts or src/scripts folders.
Follow these steps to set up the src/App.svelte file, which is the container for the other Svelte components:
In the App.svelte file, replace the default section with this code to set up a title for the interface:
The interface will change after connecting to the wallet and minting an NFT.
Remove the default
Summary
Now the contract is running on the Tezos blockchain.
You or any other user can call it from any source that can send transactions to Tezos, including Octez, dApps, and other contracts.
If you want to continue working with this contract, here are some ideas:
Change permissions for the contract so only your account can call its entrypoints
Add your own entrypoints and originate a new contract; note that you cannot update the existing contract after it is deployed
Create a dApp to call the contract from a web application, similar to the dApp that you create in the tutorial Build a simple web application
Deploy a smart contract with Archetype
This tutorial covers writing a smart contract and deploying it to Tezos in the Archetype programming language.
It uses the completium-cli command-line tool, which lets you work with Archetype contracts and Tezos from the command line.
If you are more familiar with Python, try Deploy a smart contract with SmartPy.
If you are more familiar with OCaml, try Deploy a smart contract with CameLIGO.
If you are more familiar with JavaScript, try Deploy a smart contract with JsLIGO.
In this tutorial, you will learn how to:
Create a wallet to store cryptocurrency tokens
Get free tez tokens (the native cryptocurrency token on Tezos) from a faucet
Code a contract in Archetype, including:
Defining the storage for the contract and its initial value
Defining entrypoints in the contract
Writing code to run when the entrypoints are called
Deploy (or originate) the contract to Tezos
Look up the current state of the contract
Call the contract from the command line
What is a smart contract?
A smart contract is a computer program that is stored on a blockchain and runs on a blockchain.
Because the blockchain is spread across many computer nodes, you don't have to think about where to host the program or worry whether a computer will run it or not.
Responsibility for running the contract is distributed across all of the nodes in the Tezos system, so when you deploy a smart contract, you can be confident that it will be available and unmodified when someone wants to run it.
A smart contract has these parts:
Persistent storage, data that the contract can read and write
One or more entrypoints, which are a kind of function that clients can call, like endpoints in an API or functions or methods in many programming languages
A Tezos account that can store tokens (technically, the contract is itself a type of Tezos account, but you can think of it as a program with a Tezos account)
The Archetype language
Archetype is a high-level language designed specifically for writing Tezos smart contracts.
It has features that help you write smart contracts, including:
Clear syntax that maps closely with how smart contracts work
Enhancements that simplify working with storage
Tools that help you verify conditions before running code, such as ensuring that the caller is authorized to run the entrypoint
The ability to set up a contract as a state machine, which gives the contract a state and manages transitions between states
The ability to verify that the contract does what it says it does through the process of formal verification
Like the other languages that Tezos accepts, Archetype code is compiled to Michelson to run on the blockchain.
For more information about Archetype, see https://archetype-lang.org/.
Tutorial contract
The contract that you deploy in this tutorial stores a single integer.
It provides entrypoints that clients can call to change the value of that integer:
The increment entrypoint accepts an integer as a parameter and adds that integer to the value in storage
The decrement entrypoint accepts an integer as a parameter and subtracts that integer from the value in storage
The reset entrypoint takes no parameters and resets the value in storage to 0
After you deploy the contract, you or any other user can call it from various sources, including web applications, other contracts, and the Octez command-line client.
However, no one can prevent it from running or tamper with its code or its storage.
Prerequisites
To run this tutorial, you need the completium-cli program:
Make sure that NPM is installed by running this command in your command-line terminal:
If NPM is not installed, install Node.JS on your computer, which includes NPM, from this link: https://nodejs.org/en.
Install completium-cli by running this command:
You can verify that completium-cli installed by running this command:
If you see a message with the version of completium-cli, it is installed correctly.
Initialize completium-cli by running this command:
Using a testnet
Before you deploy your contract to the main Tezos network (referred to as Mainnet), you can deploy it to a testnet.
Testnets are useful for testing Tezos operations because testnets provide tokens for free so you can work with them without spending real tokens.
Tezos testnets are listed on this site: https://teztnets.com/.
The Ghostnet testnet is a good choice for testing because it is intended to be long-lived, as opposed to shorter-term testnets that allow people to test new Tezos features.
By default, completium-cli uses Ghostnet, but these steps verify the network:
Verify that completium-cli is set to use Ghostnet by running this command:
The response shows the RPC endpoint that completium-cli is using, which is its access point to the Tezos network.
If the response shows Current network: ghost, it is using Ghostnet.
If completium-cli is not using Ghostnet, switch to Ghostnet by running this command, selecting any endpoint labeled "ghost," and pressing Enter:
Creating a local wallet
Deploying and using a smart contract costs fees, so you need a local wallet and XTZ tokens.
You could use the default accounts that are included in completium-cli, but follow these steps to create your own local wallet on a test network:
Run the following command to generate a local wallet, replacing local_wallet with a name for your wallet:
Switch to the account that you created by running this command, selecting the new account, and pressing Enter:
Get the address for the wallet by running this command:
The result shows the address of the account, which begins with "tz1".
You need the wallet address to send funds to the wallet, to deploy the contract, and to send transactions to the contract.
Copy the address for the account, which is labeled as the "public key hash" in the response to the previous command.
The address starts with "tz1".
On the testnets page at https://teztnets.com/, click the faucet link for the Ghostnet testnet, which is at https://faucet.ghostnet.teztnets.com.
On the faucet page, paste your wallet address into the input field labeled "Or fund any address" and click the button for the amount of XTZ to add to your wallet.
1 XTZ is enough for the tutorial.
It may take a few minutes for the faucet to send the tokens and for those tokens to appear in your wallet.
You can use the faucet as much as you need to get tokens on the testnet, but those tokens are worthless and cannot be used on Mainnet.
Fund your wallet using the Ghostnet Faucet
Run this command to check the balance of your wallet:
If your wallet is set up correctly and the faucet has sent tokens to it, the response includes the balance of your wallet.
Create the contract
The contract that you will create has these basic parts:
A variable that represents the contract's storage, in this case an integer.
Contracts can have storage in the form of primitive types such as an integer, string, or timestamp, or a complex data type that contains multiple values.
For more information on contract data types, see Data types.
Internal functions called entrypoints that run code when clients call the contract.
Follow these steps to create the code for the contract:
Run this command to create the contract file:
Open the counter.arl file in any text editor.
At the top of the file, name the contract by putting the name after the archetype keyword:
Define the storage for the contract by adding this line:
This line creates a variable in the contract's storage with the name "value."
It is an integer type and has the initial value of 10.
Any variables that you create with the variable keyword at the top level of the contract become part of its persistent storage.
Add the code for the increment and decrement entrypoints:
These functions begin with the entry keyword to indicate that they are entrypoints.
They accept one parameter: the change in the storage value, which is an integer named delta.
One function adds the parameter to the value of the value variable and the other subtracts it.
Add this code for the reset entrypoint:
This function is similar to the others, but it does not take a parameter.
It always sets the value variable to 0.
The complete contract code looks like this:
Deploying (originating) to the testnet
Deploying a contract to the network is called "originating."
Originating the contract requires a small amount of Tezos tokens as a fee.
Run the following command to originate the smart contract:
The command line shows information about the transaction, including the name of the originating account, the target network, and the cost to deploy it.
By default, it uses the local alias "Counter" to refer to the contract.
Press Y to confirm and deploy the contract.
If you see an error that includes the message contract.counter_in_the_past, you waited too long before pressing Y.
Run the deploy command again and promptly press Y to confirm it.
Print information about the contract by running this command:
The response shows information about the contract, including its address on Ghostnet, which starts with "KT1".
You can use this information to look up the contract on a block explorer.
Verify that the contract deployed successfully by finding it on a block explorer:
Open a Tezos block explorer such as TzKT or Better Call Dev.
Set the explorer to Ghostnet instead of Mainnet.
Paste the contract address, which starts with KT1, into the search field and press Enter.
Go to the Storage tab to see that the initial value of the storage is 10.
Run this command to see the current value of the contract storage:
Calling the contract
Now you can call the contract from any Tezos client, including completium-cli.
To increment the current storage by a certain value, call the increment entrypoint, as in this example:
To decrement the storage, call the decrement entrypoint, as in this example:
Finally, to reset the current storage to zero, call the reset entrypoint, as in this example:
Then, you can verify the updated storage on the block explorer or by running the completium-cli show storage Counter command.
Summary
Now the contract is running on the Tezos blockchain.
You or any other user can call it from any source that can send transactions to Tezos, including command-line clients, dApps, and other contracts.
If you want to continue working with this contract, here are some ideas:
Change permissions for the contract so only your account can call its entrypoints
Add your own entrypoints and originate a new contract; note that you cannot update the existing contract after it is deployed
Create a dApp to call the contract from a web application, similar to the dApp that you create in the tutorial Build a simple web application
Mint NFTs from a web app
This tutorial shows you how to create a web application that interacts with the Tezos blockchain to mint non-fungible tokens (NFTs). NFTs are unique digital assets that can represent art, collectibles, or virtually any kind of digital content on the blockchain. Specifically, this application will be the user-facing web front end for a smart contract that performs operations such as mint.
You will learn:
How to create a web application and import JavaScript libraries that access Tezos blockchain
How to call a smart contract from a web application
How to connect to a user's wallet
How to mint NFTs on behalf of a user
:::note
This tutorial covers creating a web application to interact with Tezos and mint NFTs.
For simplicity, it uses an existing backend application, a smart contract running on Tezos.
To create your own NFTs in a production application, you must deploy your own smart contract and backend application.
For a tutorial that covers creating both the frontend and backend application, see Create a contract and web app that mints NFTs.
:::
Prerequisites
This tutorial uses JavaScript, so it will be easier if you are familiar with JavaScript.
You do not need any familiarity with any of the libraries in the tutorial, including Taquito, a JavaScript library that helps developers access Tezos.
Before start creating this dApp, we will need a wallet and some ghostnet tez(ꜩ).
The smart contract
The backbone of this application is the smart contract deployed on the Tezos blockchain. The contract we'll be using is already deployed and is written in SmartPy. It defines the rules and processes for interactions with the Tezos blockchain, such as minting NFTs. All you need to do is integrate it into your web app.
You can view the contract in a block explorer such as this one: https://better-call.dev/ghostnet/KT1Lr8m7HgfY5UF6nXDDcXDxDgEmKyMeds1b/operations
The source code of the contract is here: https://github.com/trilitech/tutorial-applications/blob/main/simple-nft-svelte/contract/simple-nft.py
The tutorial application
In this tutorial, you build a web application that allows users to mint NFTs via the smart contract.
The interface of the application will look like this:
Mint UI
The application can perform many individual actions, including:
Connecting and disconnecting users' wallets
Displaying users' information, including their wallet address and tez balance
Allowing users to mint NFTs on the Tezos blockchain
The application is based on JavaScript, so it uses several JS and TS-based tools to build and package the application:
Svelte for the JavaScript framework
JavaScript to make the JavaScript code safer and more expressive
Vite (pronounced like veet) to bundle the application and provide the libraries to the user's browser
Also, to access the user's wallet and run transactions on Tezos, the application uses these libraries:
Taquito to interact with the Tezos blockchain
Beacon to access users' wallets
You can see the completed tutorial application here: https://github.com/trilitech/tutorial-applications/tree/main/simple-nft-svelte
When you're ready, move to the next section to begin setting up the application.
"Part 1: Setting up the application"
You can access Tezos through any JavaScript framework.
This tutorial uses the Svelte framework, and the following steps show you how to start a Svelte application and add the Tezos-related dependencies.
If you are familiar with Svelte, note that this application includes its own Svelte SPA, so it does not require SvelteKit.
Setting up the app
Run these commands to install Svelte with JavaScript and Vite:
Install the Tezos-related dependencies:
Install the buffer, events, and vite-compatible-readable-stream libraries:
Install a plugin to handle SASS styling for the site:
Update the vite.config.js file to the following code:
This updated file includes these changes to the default Vite configuration:
It sets the global object to {} so the application can provide the value for this object in the HTML file
It includes the a path to the Beacon SDK
It provides polyfills for readable-stream and stream
Update the default HTML file, index.html, to the following code:
This updated file sets the global variable to globalThis and adds a buffer object to the window.
The Beacon SDK requires this configuration to run in a Vite app.
File structure
The final structure of the tutorial application will look like this:
Here are descriptions for each of these files:
assets -> Contains the favicon and other static files such as images for the application.
lib -> Contains the components that make up the app interface:
app.css -> Contains global styles that apply to the entire app.
App.svelte -> The entrypoint of the application, which contains the components that are bundled into the final application.
main.js -> Where the JavaScript for the app is bundled before being injected into the HTML file.
vite-env.d.ts -> A JavaScript declaration file automatically generated by Vite to provide type definitions for environment variables.
index.html -> Contains the root element where the Svelte app gets attached.
jsconfig.json ->
package.json -> Contains metadata about the project like its name, version, and dependencies.
svelte.config.js -> Configuration file for the Svelte application.
vite.config.js -> Used to customize Vite's behavior, including defining plugins, setting up aliases, and more.
Importing the style sheets
These steps set up the style sheets for the application:
In the src/main.js file, import the style sheets by replacing the default code of the file with this code:
This code targets the body tag to inject the HTML produced by JavaScript instead of a div tag inside the body tag as Svelte apps do by default.
Your applications can target any tag on the page.
Configuring Svelte
Svelte files include several different types of code in a single file.
The files you will create have separate sections for JavaScript, style, and HTML code, as in this example:
Svelte components are fully contained, which means that the style and JS/TS code that you apply inside a component doesn't leak into the other components of your app.
Styles and scripts that are shared among components typically go in the src/styles and scripts or src/scripts folders.
Follow these steps to set up the src/App.svelte file, which is the container for the other Svelte components:
In the App.svelte file, replace the default section with this code to set up a title for the interface:
The interface will change after connecting to the wallet and minting an NFT.
Remove the default